Fonder started with a simple question: what if an iPhone camera could feel a little more like shooting film? This is the development diary — the films that worked, the ones that didn't, the tiny details nobody asked for, and everything I'm learning while building it. Colour, grain, cameras, broken builds, long nights and rolls of photos included.
Notes from building Fonder: films fitted to real camera renders, recipes that behave like the camera's own controls, and the app around them.
Every image on this page comes from my own camera files or my own phone, rendered through Fonder. Where a picture sits next to “the camera”, that side is the camera's own JPEG of the same shutter press.
Some photos used during development and local testing come from dpreview's public sample gallery. They're used only for testing on my own machines and aren't published here.
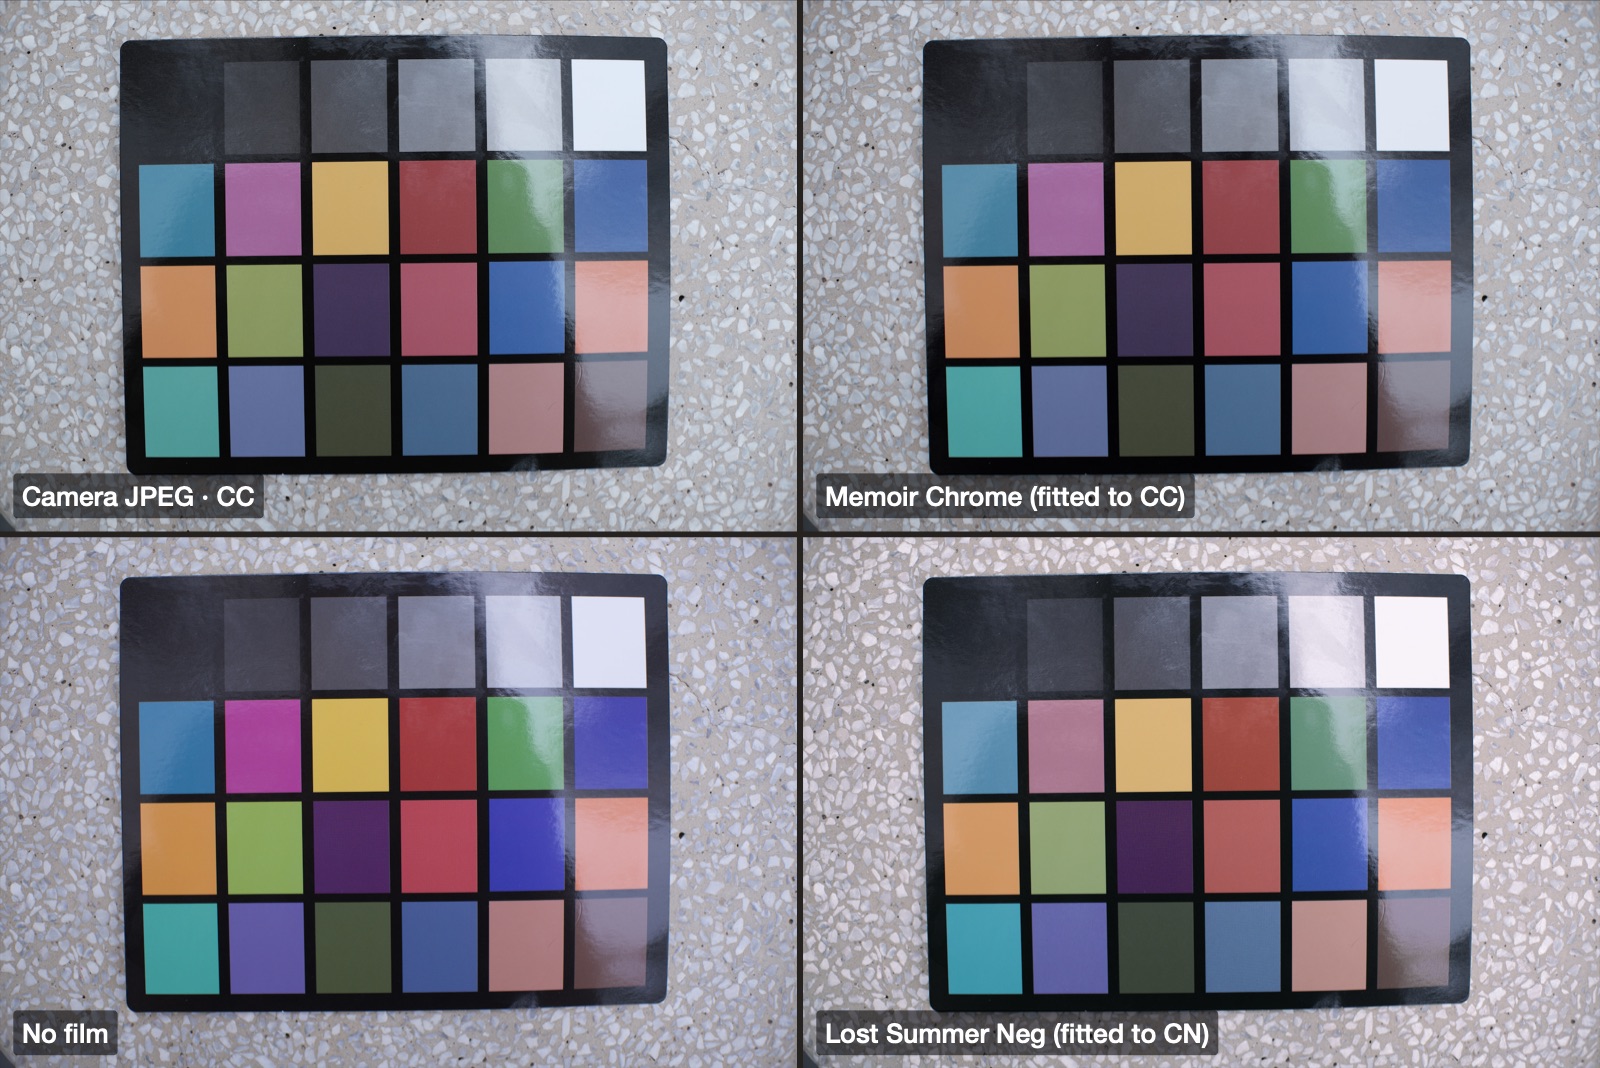
CC, CN, RA and NN stand for the camera simulations each fitted film follows. The film names are Fonder's own.
01Film engine and first looks
A film in Fonder is a set of colour moves baked into one lookup table, run through the same render graph as the viewfinder and the export.
The film colour engine went in on 11 September. Each film is a handful of colour moves (which hues turn, how quickly saturation rolls off, where the tones sit) baked into a 3D lookup table. The viewfinder, the capture and the export all run the same graph, so what you see while shooting is what you get.
The first palette mostly paled colours, which isn't what film does. Widening the chroma knee and re-authoring every film fixed that, and set a rule I still use: a film has to reinterpret hues, red toward orange and blue toward navy, not just take colour away.
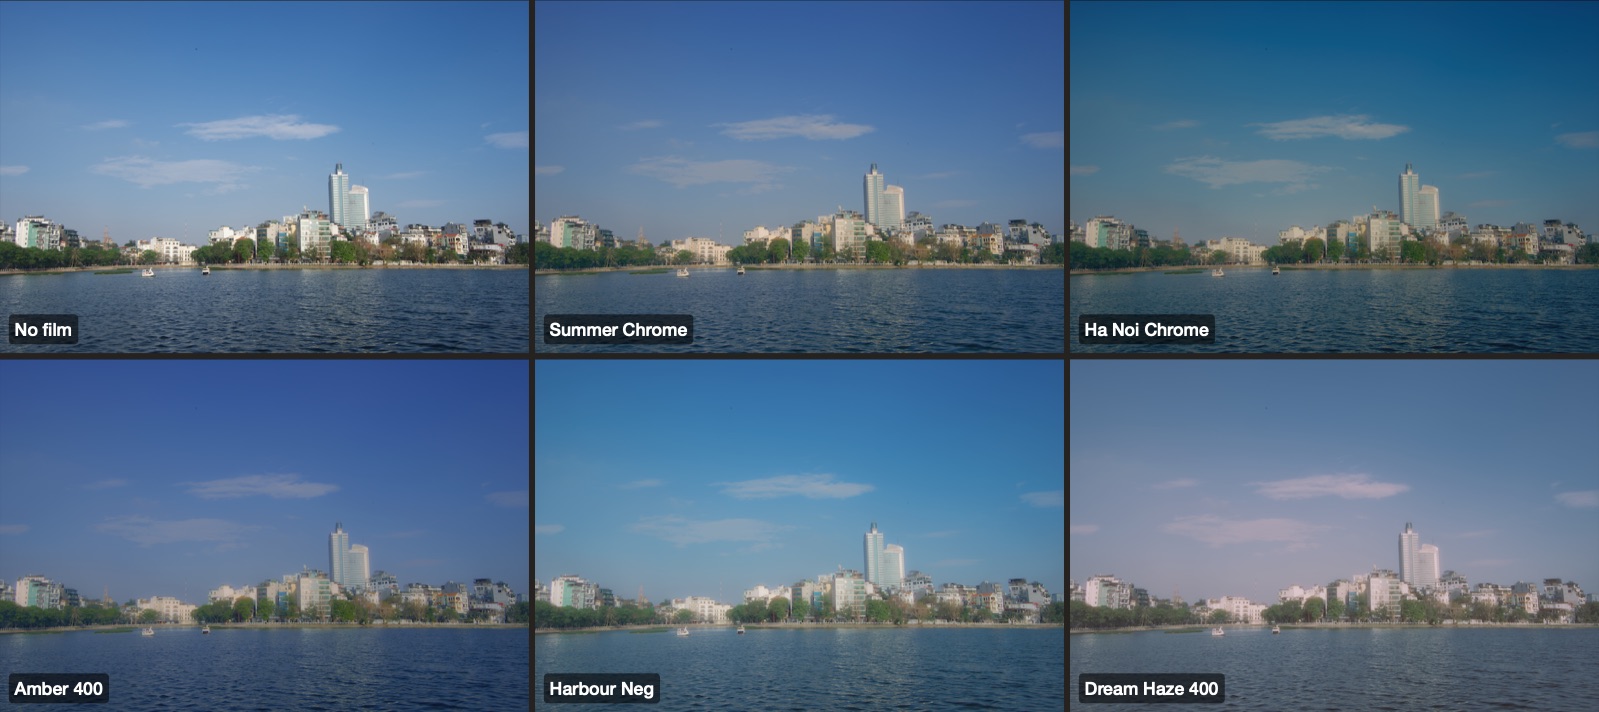
One RAW of a Hanoi lake through some of the first looks, rendered with today's engine. Each one takes the blue of the sky and the water somewhere different. From DSCF8912.
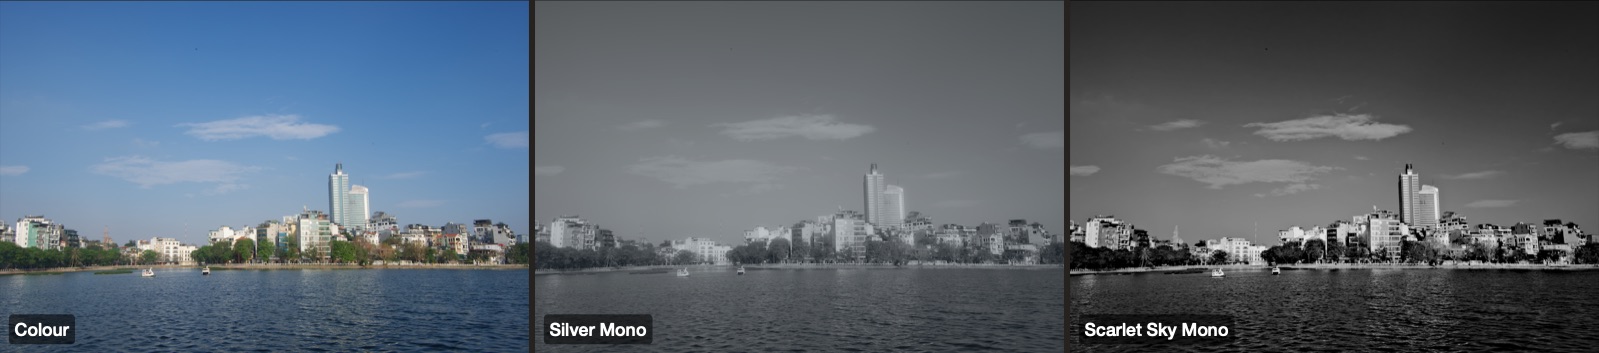
Black-and-white films used to be a plain grey conversion. On 16 September they got a channel mixer, so each mono film behaves as if it were shot through a colour filter: a red filter darkens a blue sky, a green one lightens leaves.
Silver Mono is close to a neutral conversion. Scarlet Sky Mono carries a red filter, so the blue sky and water drop toward black while the white buildings stay bright.
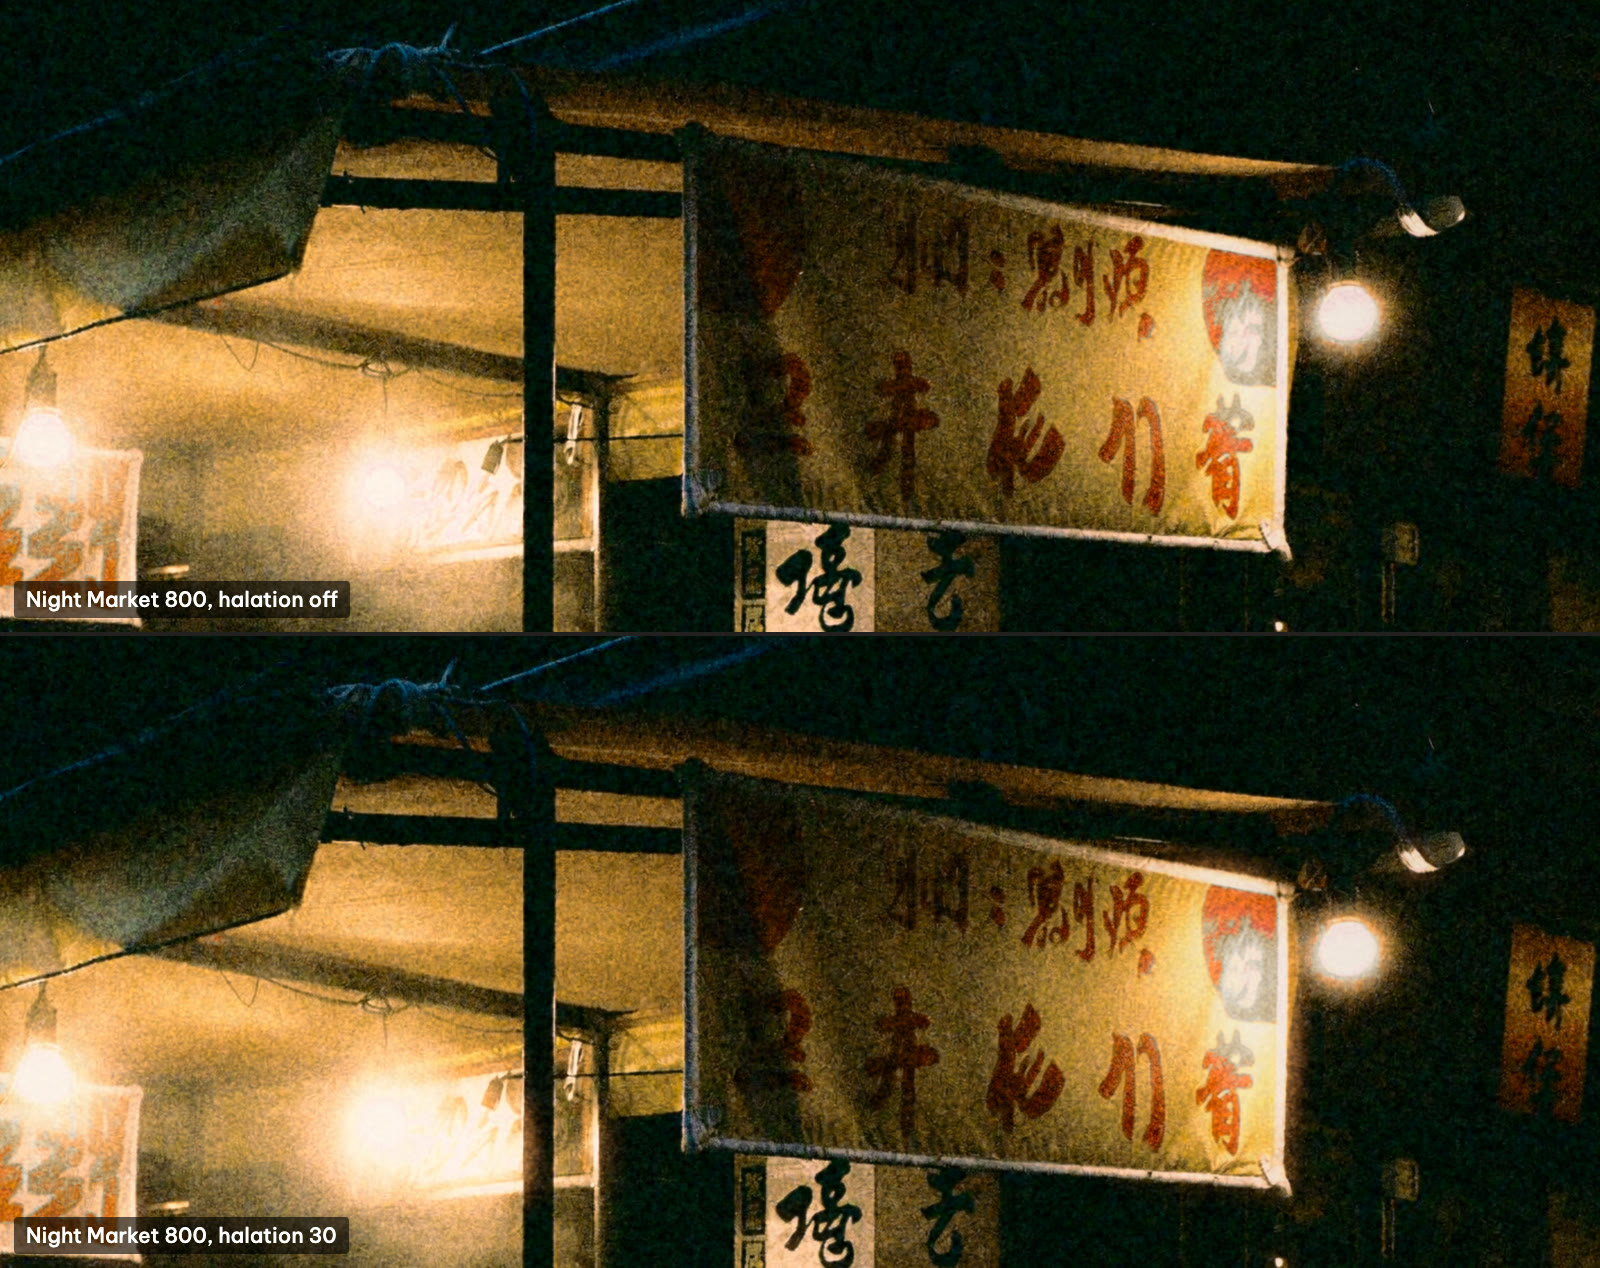
Halation is the warm glow film gets around bright things, from light bouncing back through the emulsion. My first version only switched on above a threshold real photos almost never reached, so it did nothing. The fix on 14 September let it bloom at every dynamic range, at a level ordinary highlights reach. A later gain fix made it stronger, and on 23 September every look's halation was halved to match.
Night Market 800 on a food stall at night, with halation off and at the recipe's 30. The glow appears only around the brightest parts: the bulbs and the edge of the lit banner. The picture is a generated one, not a photograph, cropped to the awning.
The starburst arrived on 22 September. It looks for small, very bright points, such as street lamps or string lights, and gives them soft rays. Large bright areas like signs and sky are left alone, which is what stops it looking like a lens filter.
Grain started as one global slider. On 15 September it became a grey, film-like grain matched against a reference camera's, and on 17 September each recipe got its own amount, so a recipe that promises grain carries it.
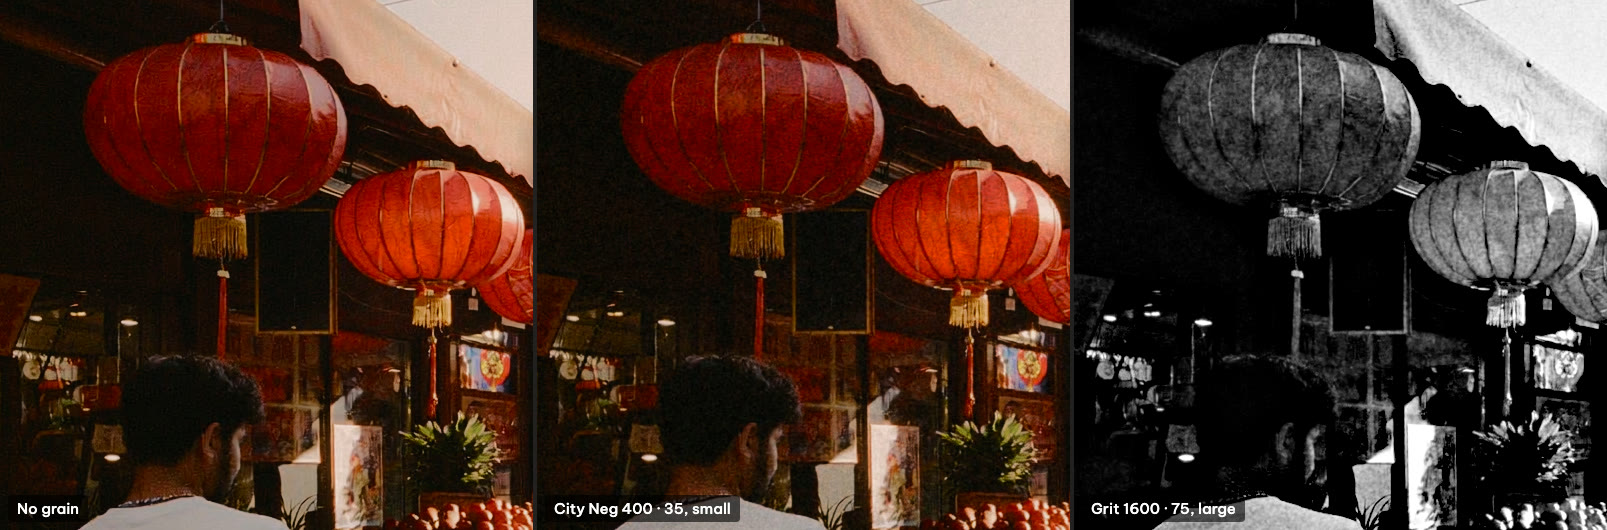
On 24 September the grain was rebuilt: finer and cleaner, with every recipe's grain moved onto the new scale. On that scale 30–40 is a light grain that reads as film, 60 is a coarse fast-film grain and 100 is the heaviest. Grain is sized for the resolution it's rendered at, so it looks the same on a phone screen and in a full-size file.
100% crops from a 2016-pixel render of a generated market street, not a photograph. City Neg 400 carries a light, small grain (35); Grit 1600 a large, heavy one (75). The picture arrived with a little grain of its own, so the first crop is not perfectly clean.
03Fitting the camera simulations
Four films were fitted to real camera renders instead of being authored by eye.
The why, in one sentence: "looks good" and "behaves like the camera" turned out to be different things, so I stopped trusting my eye alone and started measuring pairs of the same shutter press.
Until 23 September every film was authored by eye. Then I started fitting films to the camera's own renders, from pairs of the same shutter press: the RAW, and the camera's picture of it with one simulation and every other control neutral.
Collect pairs. One shutter press each: the RAW plus the simulation's rendering of it, at DR100 with tone, colour, colour chrome and grain off. Either the camera's own JPEG, or the maker's RAW converter changing only the simulation, checked against its settings sidecar.
Develop the RAW the way Fonder does. Sharpening off and the camera's own white balance, so the film learns only Fonder's picture → the camera's picture.
Align. The converter's lens correction magnifies the frame by 1.3–1.5% and bends it differently, so a tile aligner with a radial plus smooth-field model brings each pair to within 0.04–0.34 px. (It read vertical offsets upside down at first, which smeared the early proofs; fixed the same day.)
Sample. Both images are averaged in linear light onto a 966×644 grid, one sample per 8×8 sensor pixels, and sorted by colour band and tone zone. Clipped areas, edges and thin cells are left out, and the tool reports which colours are still unmeasured.
Fit. Bake a candidate film, render it through the real pipeline, compare with the camera in ΔE2000 and OKLab with every pair weighted equally, and adjust one number at a time until nothing improves. A chroma-tail term keeps the strongest colours from coming out pale.
Check. Leave one pair out and score the film on it, compare against no film and every other film, render every RAW in full and look at it, and check that hues turn rather than fade.
Name it, and set its first recipe from a recipe I actually shoot on the camera.
Chip
Film
Source
Pairs
ΔE2000, no film → film
CC
Memoir Chrome
camera JPEG, colour chart
47 patches
fitted on the chart
RA
Diary Neg
camera JPEG, two bodies
9
3.42 → 1.89
NN
Afterglow Neg
RAW converter
10
4.01 → 2.09
CN
Lost Summer Neg
RAW converter
15 (12 fitted)
7.21 → 2.60
Mean ΔE2000 over the fitted pairs. Around 2 is a difference you can see side by side but hardly on its own. Some of the RA, NN and CN pairs aren't my photos, so those comparisons aren't shown here.
My chart RAW (DSCF6531) against the camera's own JPEG of it. Top: the camera in CC, and Memoir Chrome, the film fitted to CC. Bottom: no film, and Lost Summer Neg, fitted to CN, which turns the magenta patch dusty rose and the reds toward brick.
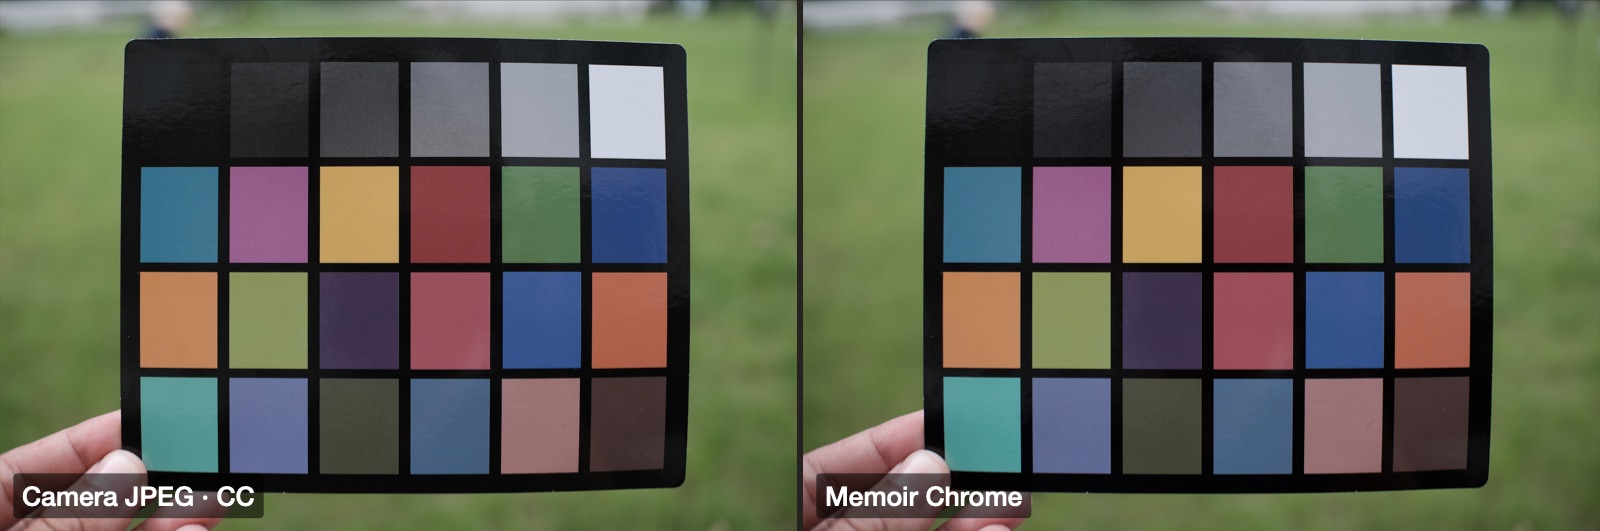
Memoir Chrome was fitted on the chart's 47 patches (CC). A second chart, hand-held over grass in daylight, checked that the fit held away from the frame it was fitted on. Its first recipe, Still Air 100, came the same day.
DSCF6532: the camera's JPEG in CC (left) and Memoir Chrome on the same RAW (right).
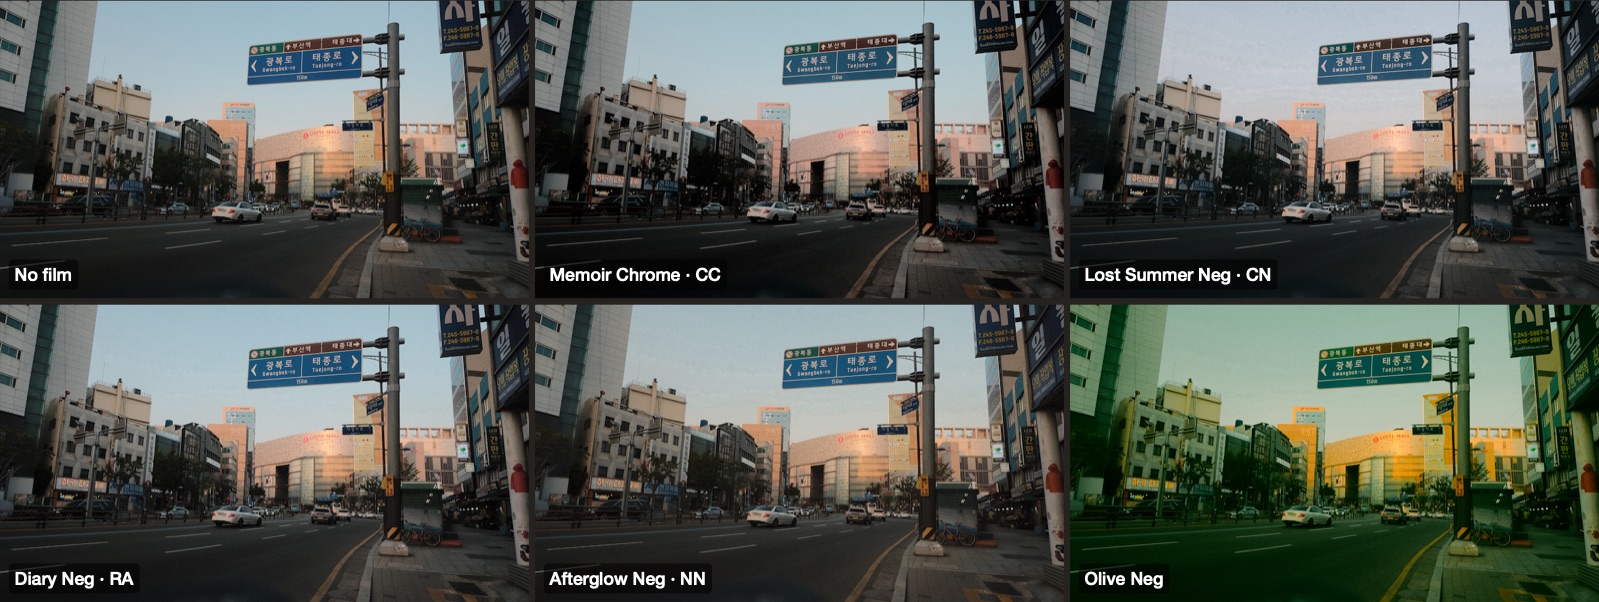
The four fitted films, plus Olive Neg, on one frame at full strength, with every other control neutral. Olive Neg isn't fitted: it's a green-night film authored for the Underpass 400 recipe.
DSCF9950, a street in Korea at golden hour, shot as a JPEG on an X-T2. Memoir Chrome and Afterglow Neg deepen the shade, Lost Summer Neg cools and softens it, Diary Neg stays close to the scene, and Olive Neg turns the evening green and gold.
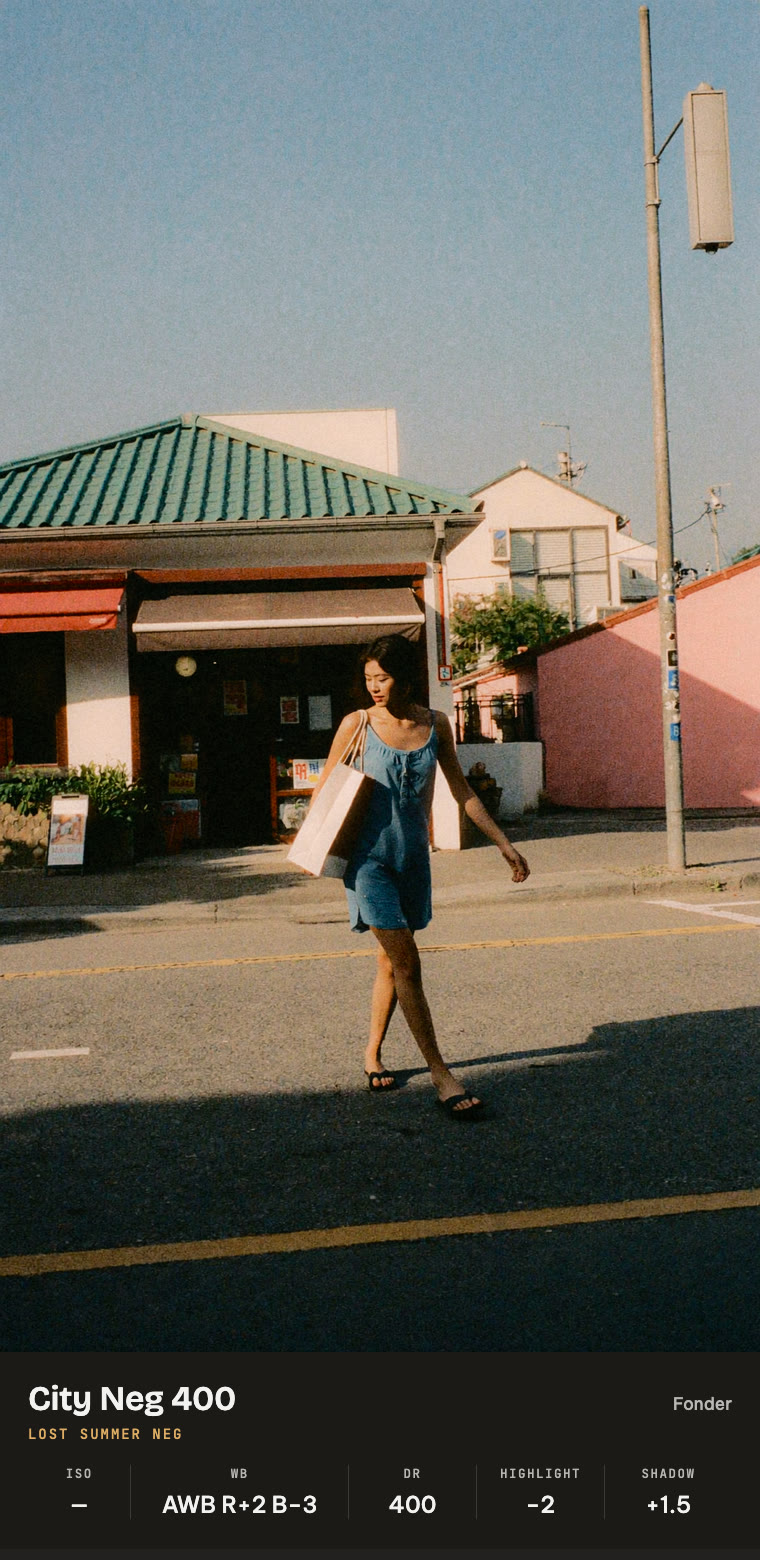
Lost Summer Neg is the CN fit: fifteen pairs, twelve of them used for the fit. My first try only paled the reds, which broke the rule from the first week, so it was refitted until the colour came out strong and shifted.
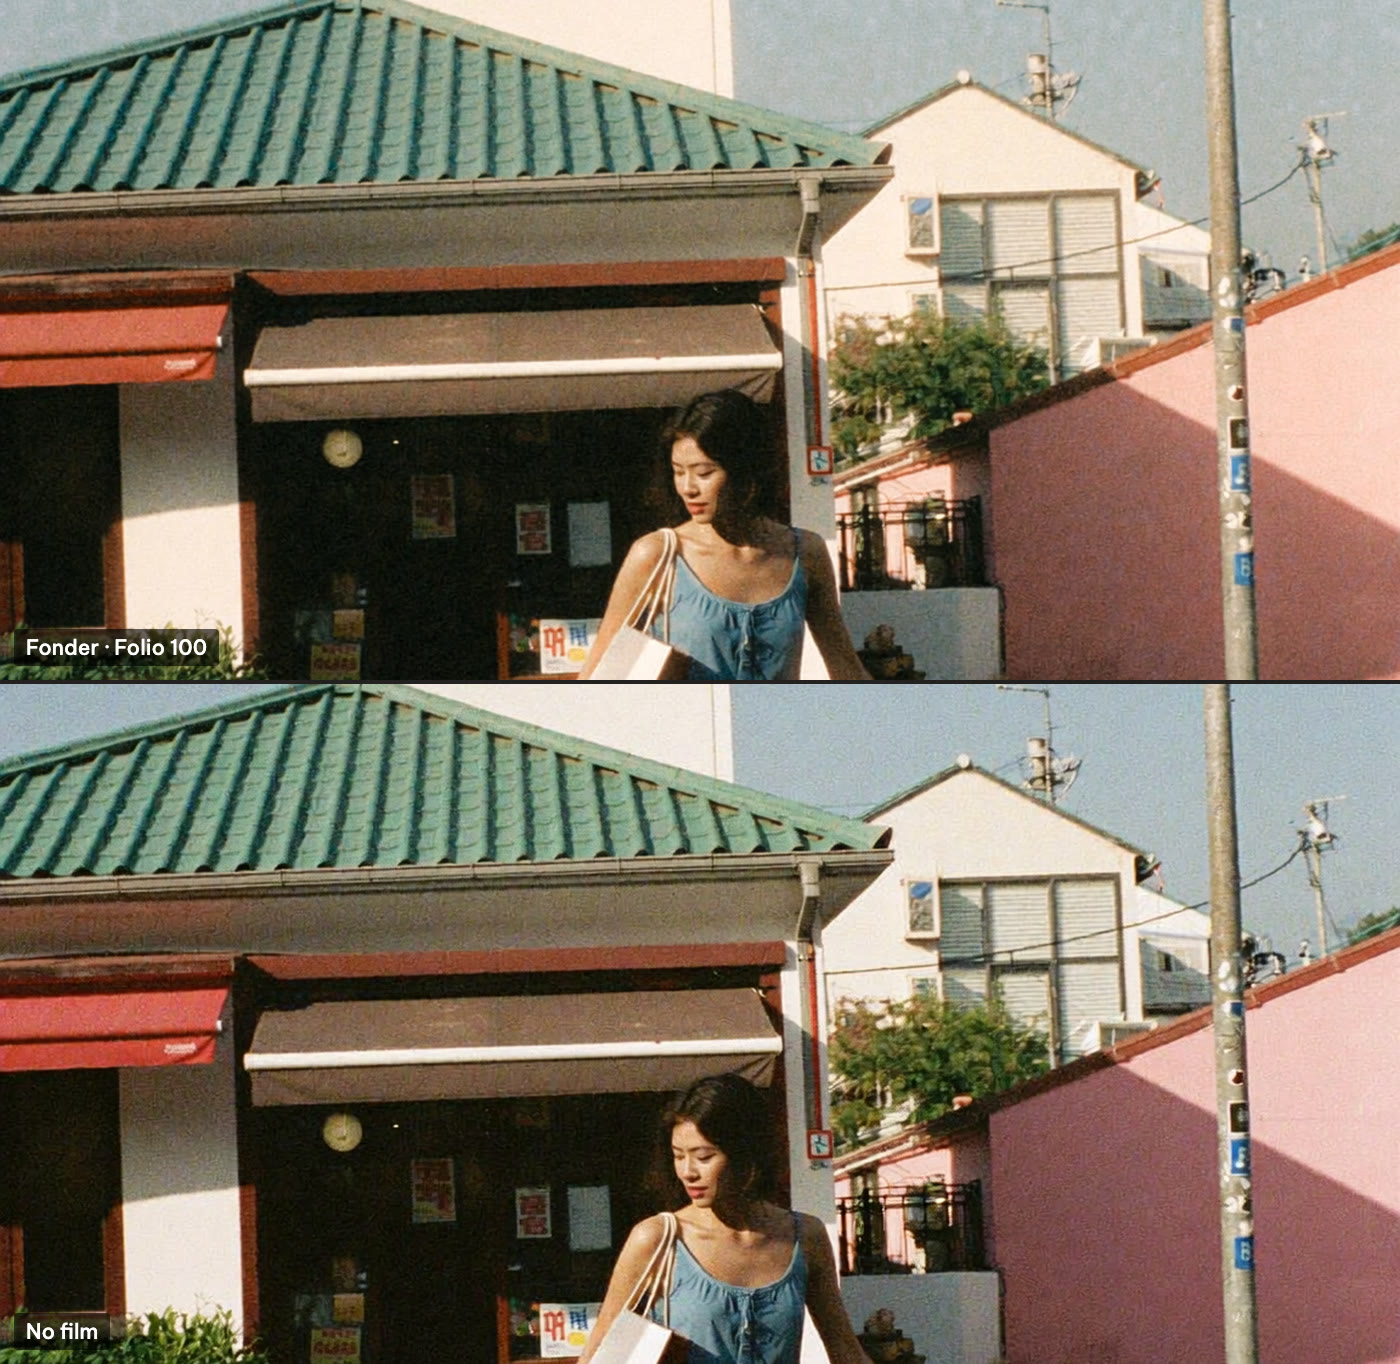
Its first recipe, Folio, is set from a recipe I shoot on the camera: CN, Daylight with B−3, colour +2 and weak colour chrome. On the camera that recipe is DR400. In Fonder it opens at DR100, because Fonder's DR400 flattened this film where the camera's doesn't, and at DR100 it matched the camera's own frame of the same scene.
A generated street scene, not a photograph, cropped to the roof and the awning. Top: Folio 100. Bottom: no film. The sky pales, the green roof goes grey-teal, the red awning turns toward vermilion and the pink wall toward salmon. The camera's own frame that Folio was matched against is no longer shown here.
Strong recipes shouldn't turn faces orange. Protect skin fades a recipe's colour on skin tones and keeps it everywhere else, and it deliberately leaves wood and other warm surfaces alone. The same day a film-skin finish went in for every film, and the portrait recipes were retuned for it. Portrait recipes open with no grain, because grain adds texture a face doesn't want.
There are no pictures in this chapter: the test frames are portraits, and this diary shows no faces.
05Recipes
Recipes sit on top of films: dynamic range, tone, colour, white balance, grain and the rest.
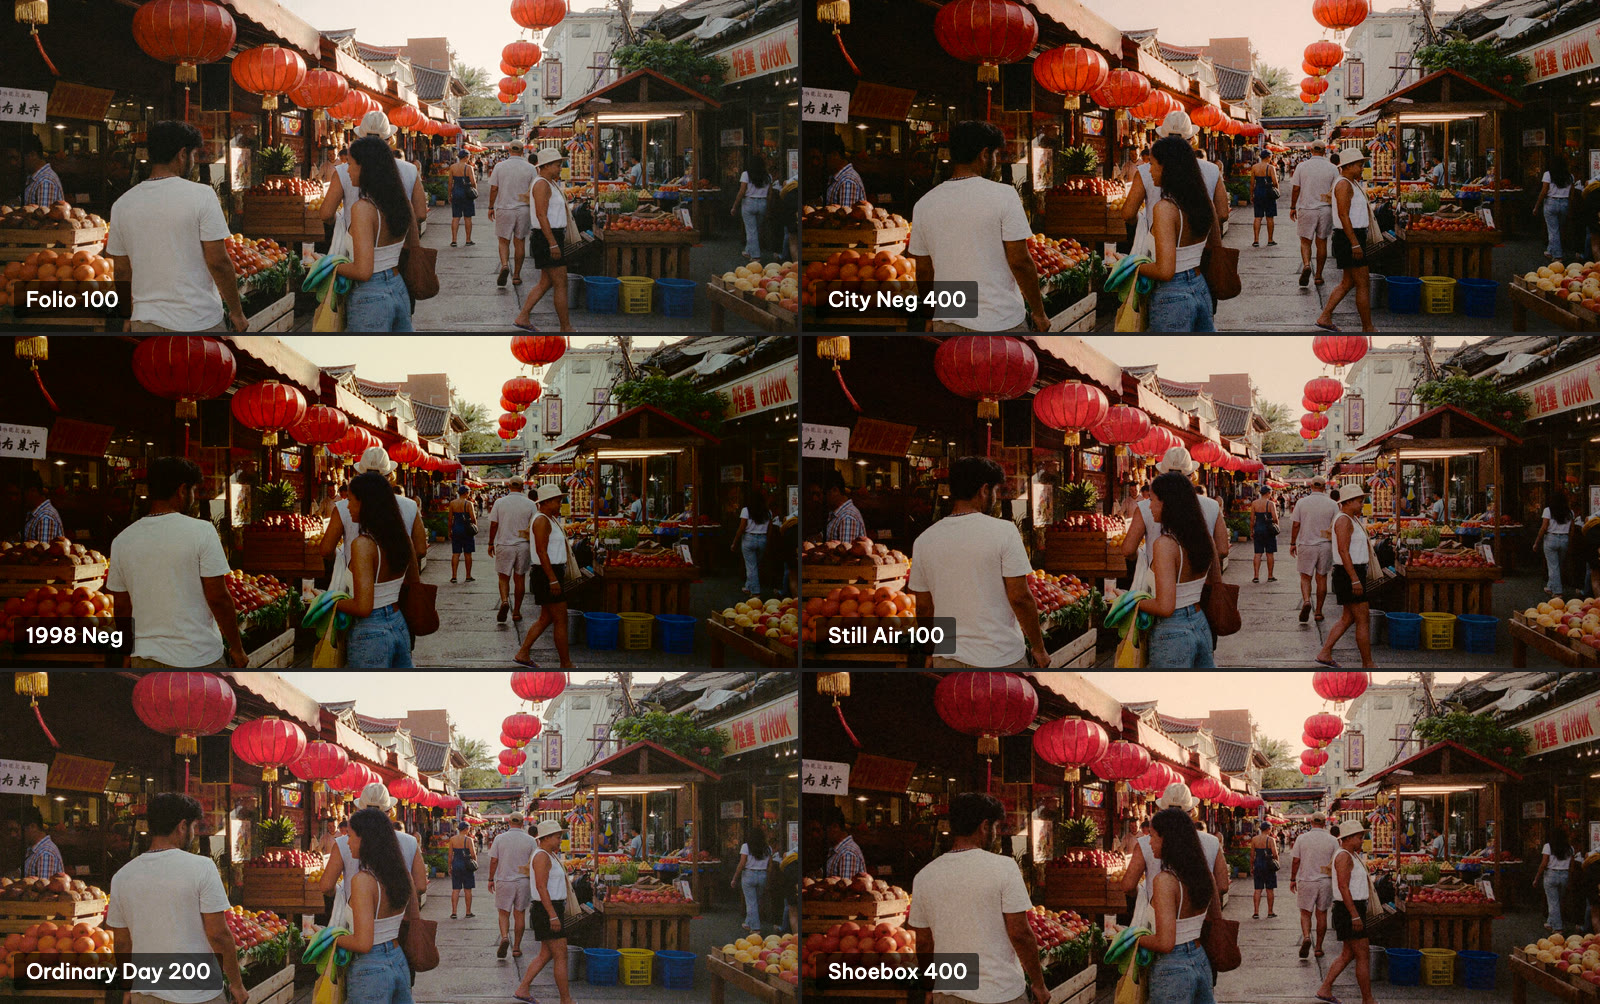
Several recipes come from recipes I shoot on the camera, translated control by control: Still Air 100 and Ordinary Day 200 on 23 September; 1998 Neg, Shoebox 400 and Folio on 24 September; City Neg 400 on 25 September. Since white balance was rebuilt, each keeps its source's mode: an Auto recipe is AWB, a Daylight one uses the Daylight preset, and Shoebox keeps its fixed 6700 K. Halation and vignette are Fonder's own additions; the source recipes don't have them.
A generated market street, not a photograph, through six recipes at the camera's default strength, cropped to the middle of the frame. Folio 100 and City Neg 400 are on Lost Summer Neg, 1998 Neg on Afterglow Neg, Still Air 100 on Memoir Chrome, and Ordinary Day 200 and Shoebox 400 on Diary Neg.
By 24 September there were too many films. A heatmap of the colour distance between every pair showed the near-duplicates, and four films were removed. Their recipes moved to the closest film left, and each move was checked side by side so the recipe kept its character. A shot or a shared recipe that names a removed one still opens, on its replacement.
Two recipes joined the catalogue this week, both made the same way: from a handful of reference pictures of a look I liked, set by eye over several rounds rather than fitted to a camera render.
The reference pictures are other people's photographs, so they stay on my desk. To have something fair to test on, I generated frames of the same kinds of scenes in plain, ungraded colour, then tuned each recipe until those frames read like the references. One of those frames became each recipe's sample.
Recipe
Film
Made for
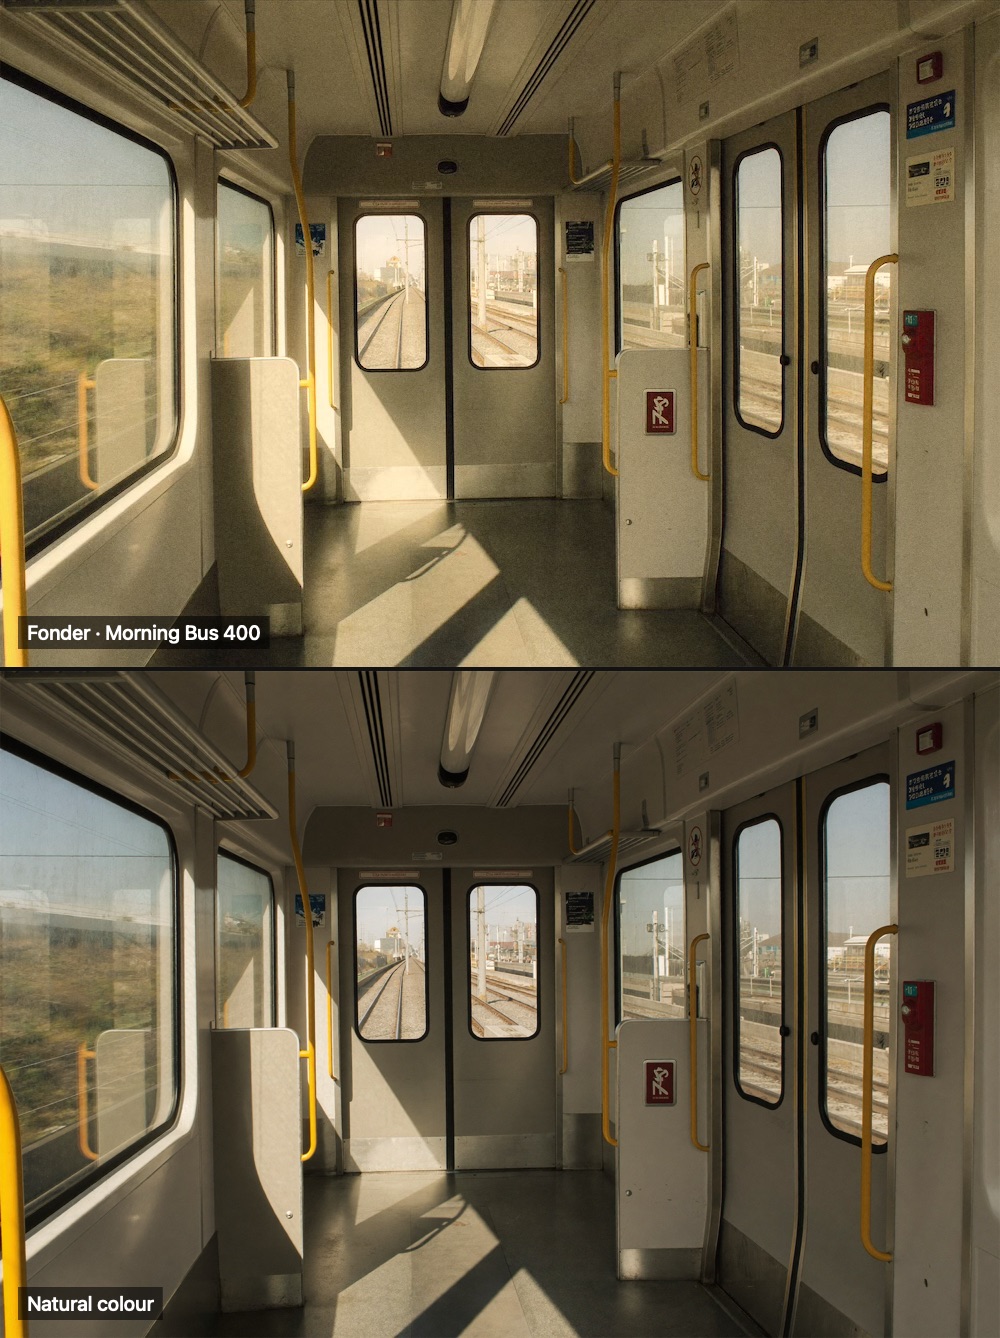
Morning Bus 400
Butter Neg
A person in the shade of a bright day: a full stop brighter with the highlights held, the film's cast eased and the balance warmed
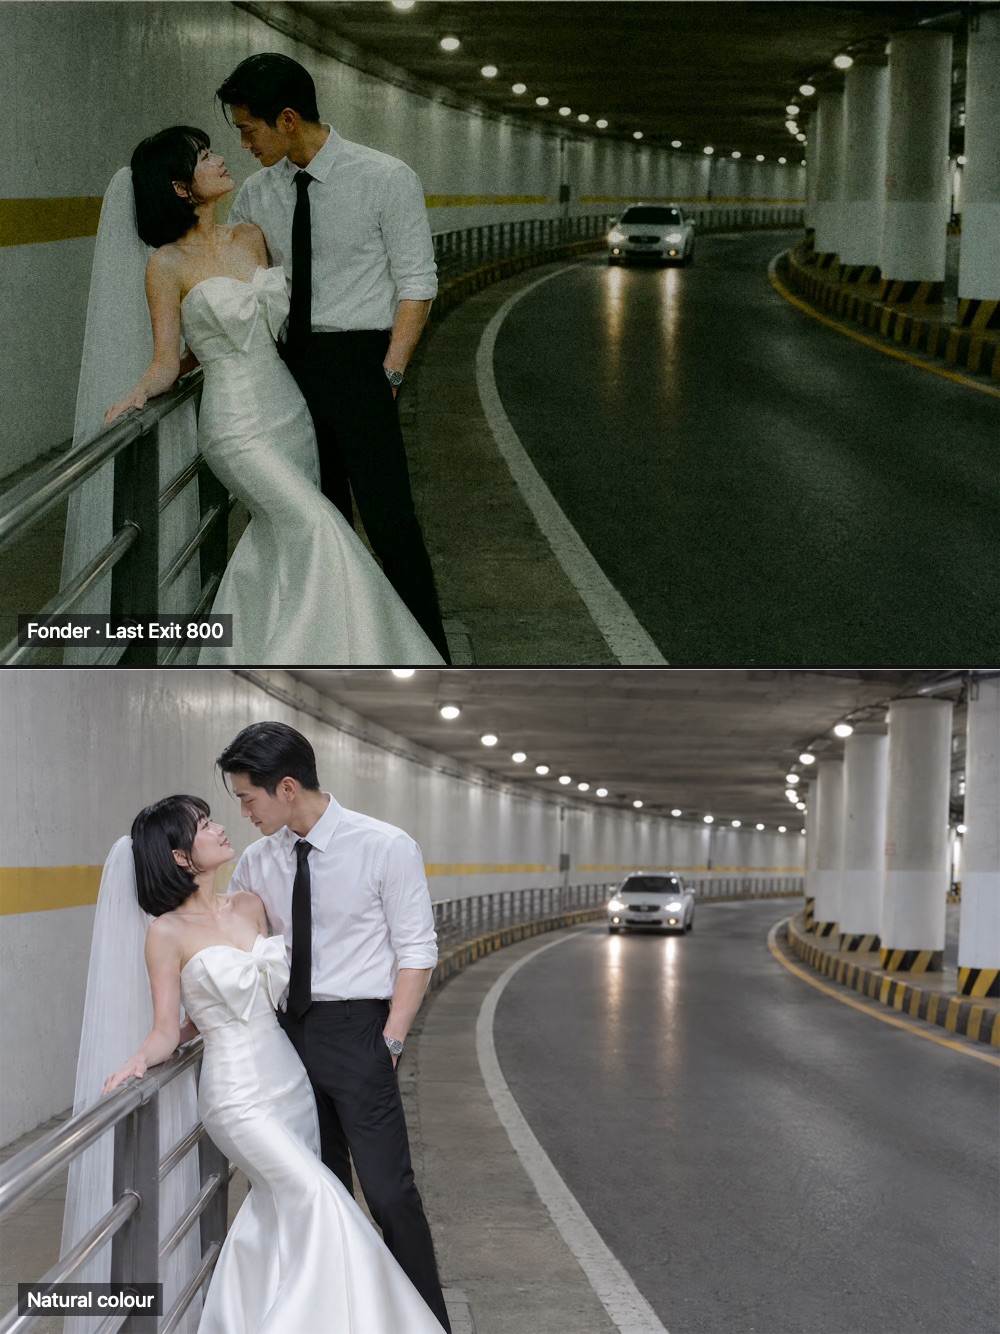
Last Exit 800
Olive Neg
People in white under tunnel or car-park lights at night: more than a stop darker, the walls sinking to bottle green while a shirt or a dress stays bright
Last Exit needed one fix the references never showed. A white shirt's glow bled red into the black tie beside it and turned it maroon, so its halation now starts only on the brightest lights. Lamps and headlights still glow, and the tie stays black.
Each recipe says in its guidance what it does badly. Morning Bus brightens everything, so a frame that is already light can look washed out. Last Exit takes the whole picture down, so a frame that is already dim falls to black.
A generated train carriage, not a photograph: Morning Bus 400 above, at the camera's default strength, and natural colour below.A generated road tunnel, not a photograph, and the couple are not real people: Last Exit 800 above, at the camera's default strength, and natural colour below.
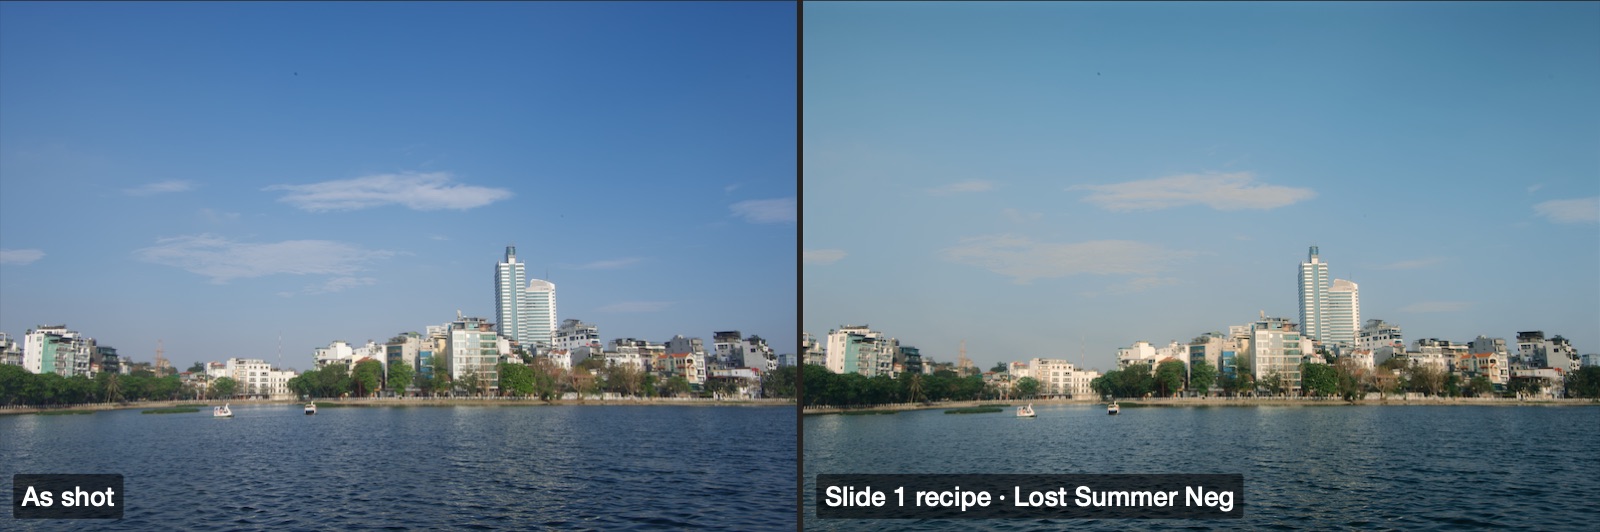
On 25 September the one-line opening screen became four slides: film, not filters; recipes that behave like a camera; shoot RAW and change your mind later; and make it yours. The camera permission is asked for at the end, never earlier. The slide pictures are pre-rendered through the same render graph as everything else.
The first slide's idea on my lake RAW: the frame as shot, and a private recipe on Lost Summer Neg (DR100, Highlight −1, Shadow +0.5, Colour +3, strong colour chrome, B−4, Clarity −2). In the app a divider sweeps between the two.
Until then the recipe controls were educated guesses. On 25 September each was measured against the camera, one at a time: colour, white-balance shift, highlight, shadow, dynamic range and colour chrome. For each one I converted the same RAW in the camera's own converter with only that control changed, and fitted Fonder's control to match.
Then every recipe was retuned onto the calibrated controls so it kept the look already approved. Most landed within 2 ΔE of their old look.
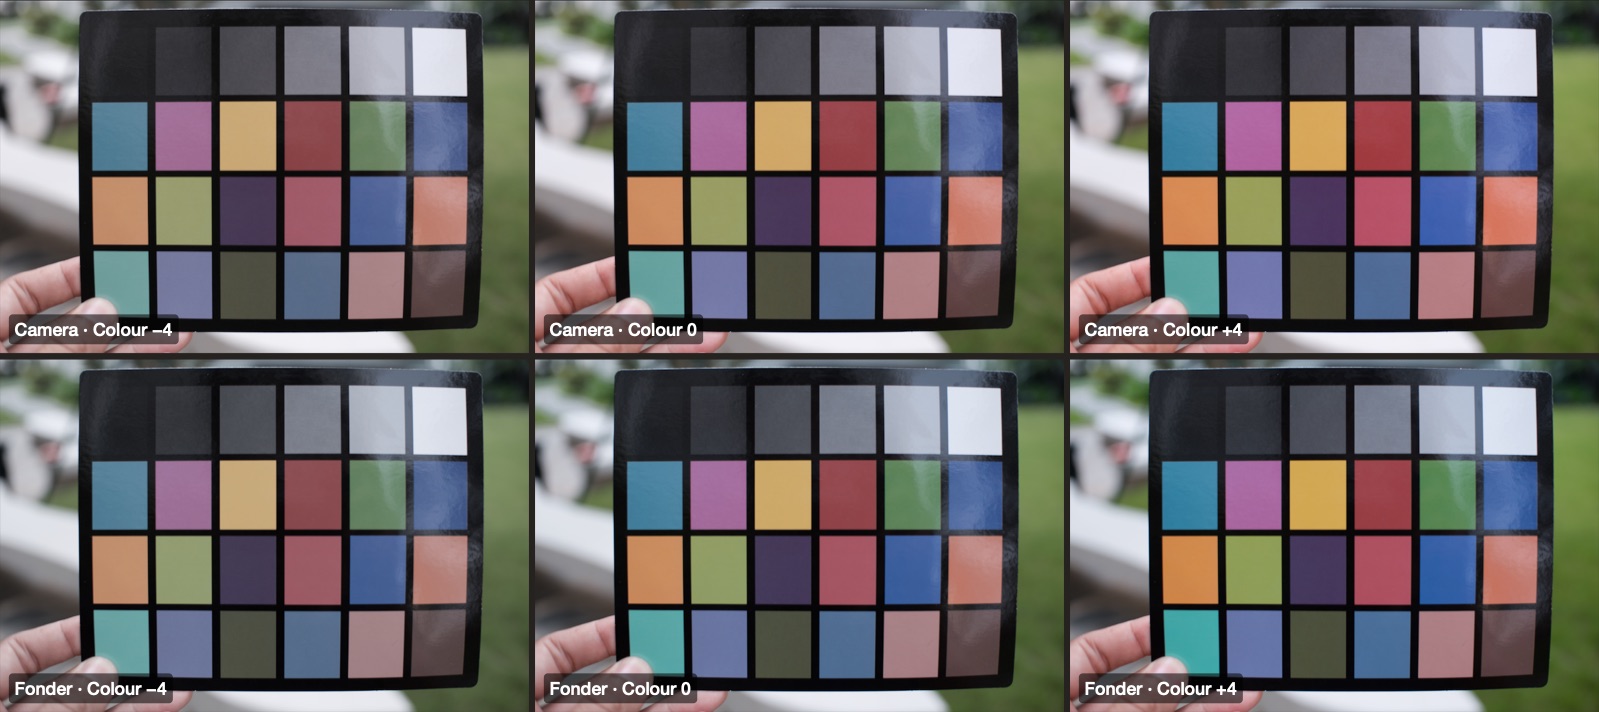
DSCF6533 at Colour −4, 0 and +4. Top: the camera's conversions in CC. Bottom: Fonder, Memoir Chrome with the same Colour setting.
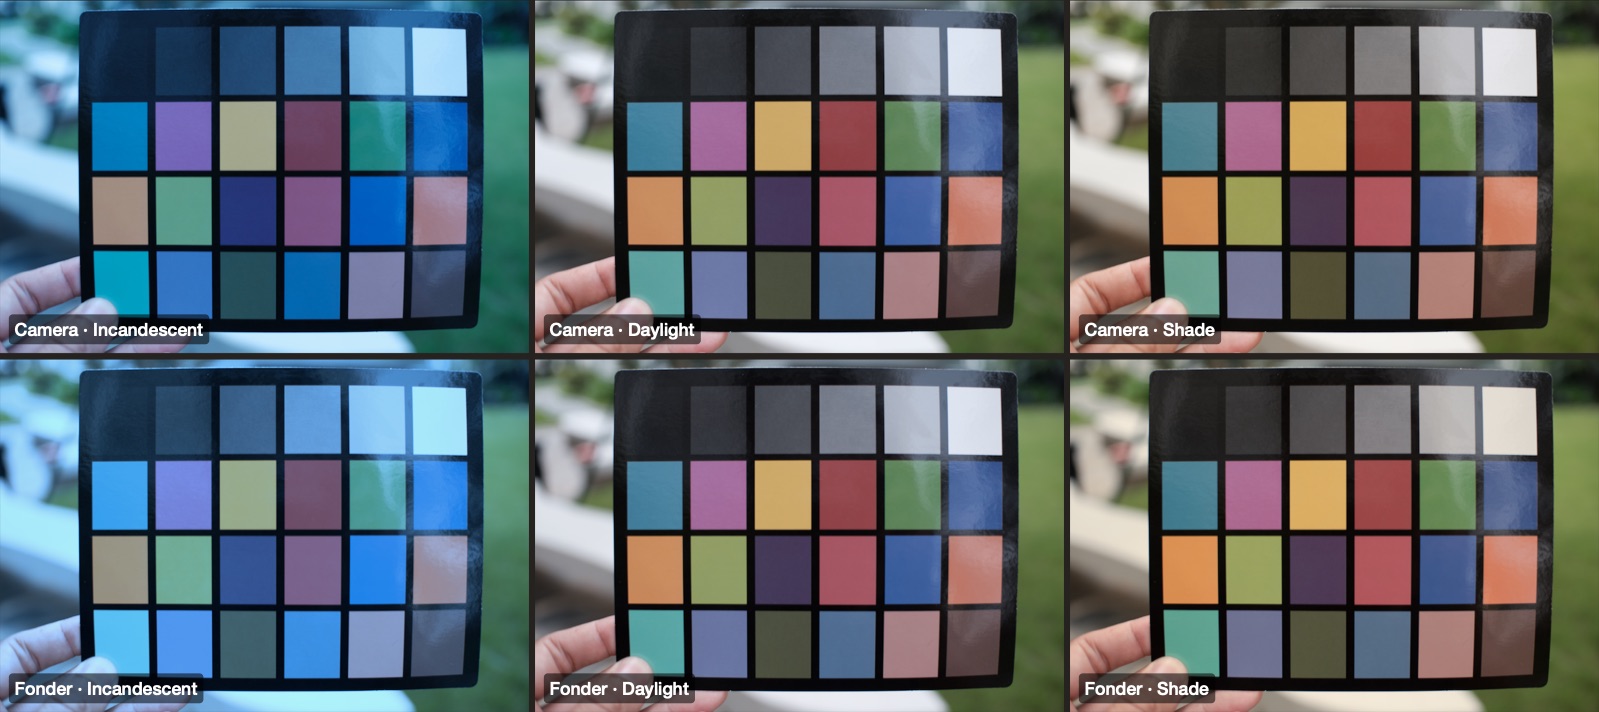
White balance now works the way it does on the camera. A preset is an absolute light: Daylight under a warm bulb turns the picture orange, because the correction runs from the light the scene was actually lit by to the preset's light, not relative to auto white balance.
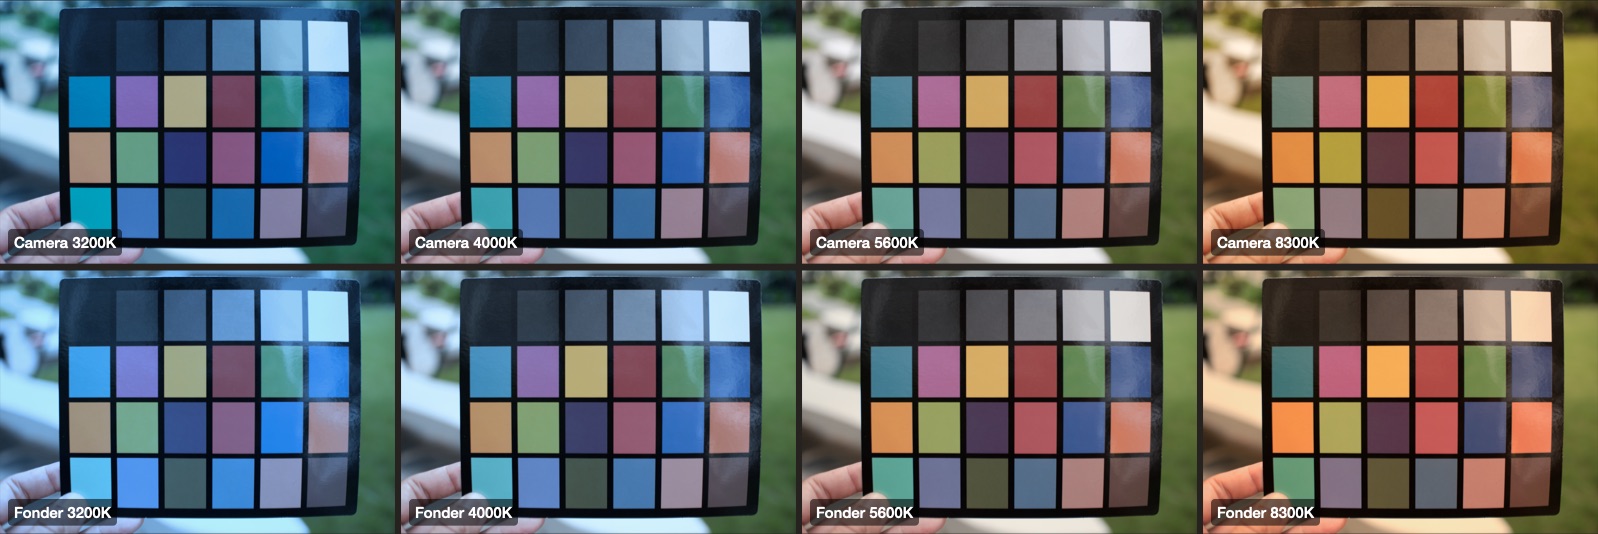
The presets were measured on my X-T3: one chart RAW converted at each preset and along a kelvin ladder from 3200 to 8300 K, then fitted through Fonder's own graph, with Daylight pinned to the camera's dial. Cloudy is derived, halfway between Daylight and Shade in mired.
Preset
Kelvin (camera scale)
Tint
Incandescent
3093 K
−7.6
Fluorescent
4345 K
+87.7
Daylight
5026 K
+7.7
Cloudy (derived)
5414 K
+2.7
Shade
5866 K
−2.4
Apple's kelvin and the camera's aren't on the same scale: the same RAW reads 5981 K in Core Image and 5026 K on the camera's dial, 31.8 mired apart, so every reading is moved onto the camera's scale first. The phone's live reading is used in the viewfinder, and a RAW's own as-shot light when it's imported.
The same day a seventh choice, K, made a fixed kelvin one tap away, so a camera recipe like “5200K, R+1 B−6” can be entered as written.
The kelvin ladder on DSCF6533: the camera's conversions (top) and Fonder with the same fixed kelvin (bottom). The cool end still runs a little bluer in Fonder.The presets on the same RAW. On the neutral patches the camera and Fonder differ by 0.005–0.013 in OKLab a/b, against 0.02–0.07 between a preset and Daylight on the camera itself.
09Cine video
The video mode: the recipe baked into every frame, built and measured here. It ships in a release after 1.0 — the first version of the app is Still and Roll.
The why, in one sentence: a look that works on one photo is useless in video if the phone drops frames rendering thirty of them a second — every frame gets 33 ms, and that number shaped everything below.
Cine records 1080p at 30 fps with the recipe in every frame. Frames go through the same render graph as photos, then to HEVC with AAC sound. It records at the ratio on screen, cut before the render so no discarded pixel is ever graded.
At 30 fps a frame has 33 ms. The first phone take of the heaviest recipe, Nightshade 800, averaged 32.1 ms: right at the edge, with dropped camera frames and a stall on every recipe switch. What brought it down:
Grain from a bank. Three grain fields rendered once and dealt out with a shift each frame, so the grain still moves: 5.3 → 1.7 ms.
Halation glow at half resolution: 5.2 → 3.5 ms, with no visible difference (mean ΔE 0.001).
4:2:0 straight to the encoder, and every camera buffer copied and released at once, which ended the out-of-buffer drops.
The recipe locked during a take and prepared between takes, so nothing is baked on the frame path.
After that the same recipe ran at 21.1 ms mean over 50 seconds with no dropped frames, and lighter recipes sit around 16–18 ms.
Heat came next. A hot phone pushed frames to 35–52 ms, and one frame took 822 ms: the first frame at a new render size was compiling its kernels. Now every rung of the render-scale ladder is warmed before the take. While the phone is cool the render steps 100 → 85 → 75%; at serious heat it can go on to 65% and 50%, with the glow at a quarter, and it climbs back only once the phone has cooled and the rung above will fit. The file stays 1080p throughout.
The why, in one sentence: bright skies were the easiest thing to lose, and flattening every picture to protect them made the rest worse — so the choice is now made per frame.
Dynamic range lets a recipe hold highlights by exposing lower and lifting the picture back, as the camera's DR200 and DR400 do. It now has Auto, which picks DR100 or DR200 (or DR400 when the ceiling allows) from how much of the scene is close to clipping.
The measure is the share of the frame whose brightest channel is at or above 90% of DR100's white, on a 256-pixel grid. It uses the brightest channel rather than brightness because a saturated blue sky clips in blue long before it looks bright.
Choice
Steps up at
Steps down below
DR200
1.5%
0.75%
DR400 (only with a 400 ceiling)
18%, or 0.5% past DR200's white
12%
It was calibrated on 35 frames: sun-and-shade and blown-sky scenes measure 2.6–35% and go to DR200, evenly lit scenes stay at DR100, and so does a colour chart. In the viewfinder it waits 0.5 s before stepping up and 1.5 s before stepping down, so it doesn't flicker. A RAW is measured from its own decode, and a Cine take locks its choice at the start.
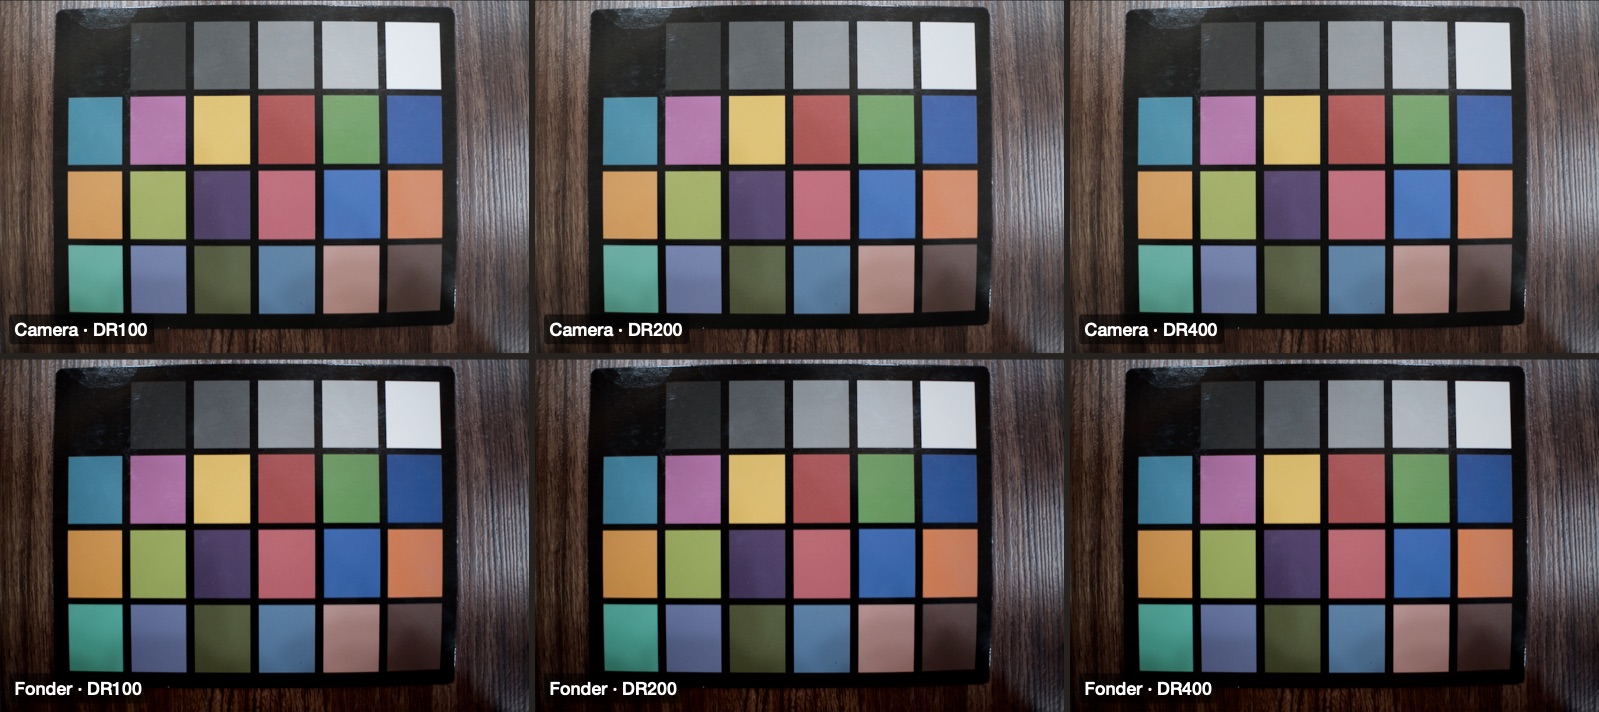
DSCF6535, indoors at ISO 800: the camera's DR100, DR200 and DR400 conversions (top) and Fonder's (bottom). Nothing on the chart clips, so the three should look almost the same, and on both sides they do.
The viewfinder lost its gradient scrims; every readout now carries its own shadow. The corner marks grow amber when a photo is taken, then settle. In Cine they stay amber for the whole take and a red edge runs round the frame; held sideways, a header with the film name and a REC pill runs along the top.
The photo preview prints the recipe and film on the picture, with five figures along the bottom: ISO, white balance, DR, highlight and shadow.
Share now offers three choices: Photo only, Card (the photo on a dark band with the recipe, the film and those five figures) and Overlay (the preview's label burned in). Card and Overlay drop location data before sharing.
A Card, drawn to the app's layout from a generated picture, not a photograph, in City Neg 400. The picture has no camera data, so ISO shows a dash, as the app shows it.
12Film Roll
A third camera mode: load a film, shoot the roll without seeing it, then develop.
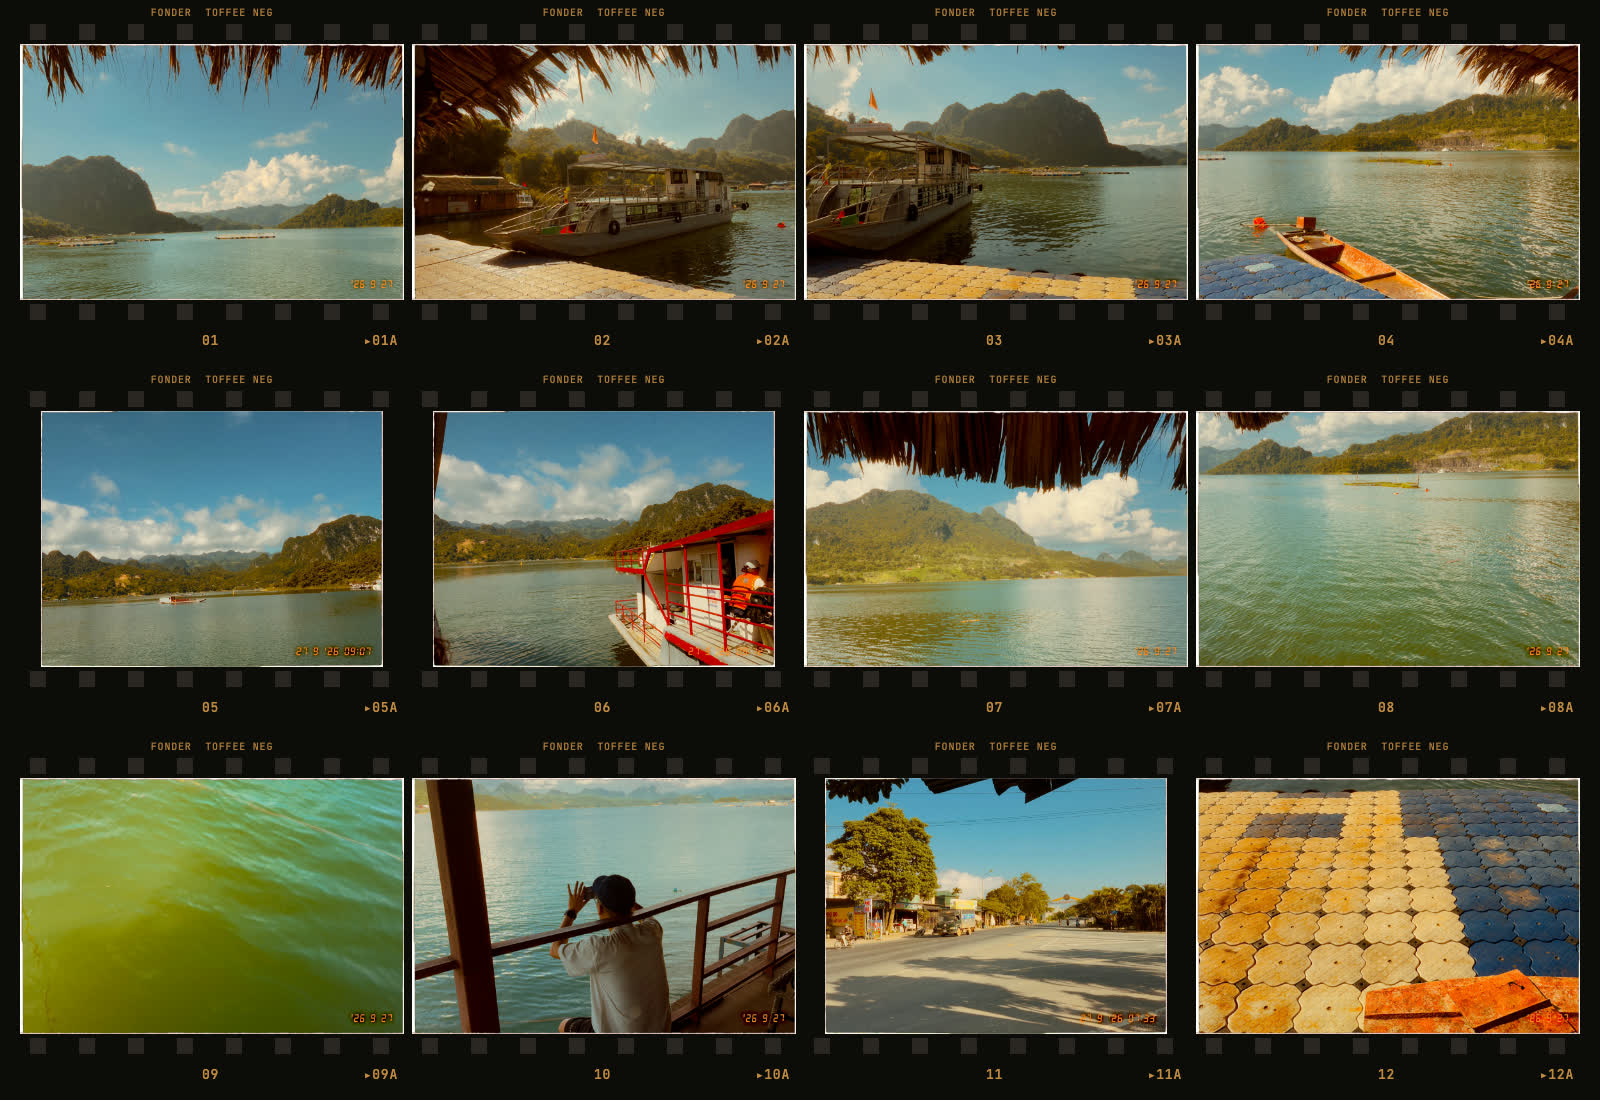
Film Roll is the third mode on the pill, next to Still and Cine. You pick a film (the free films, or every film with “Unlock everything”) and a roll of 12, 24 or 36 exposures. The roll stays locked to that film until it's developed. While shooting you see either negatives or no preview at all, and the last-shot tile only plays the film advancing.
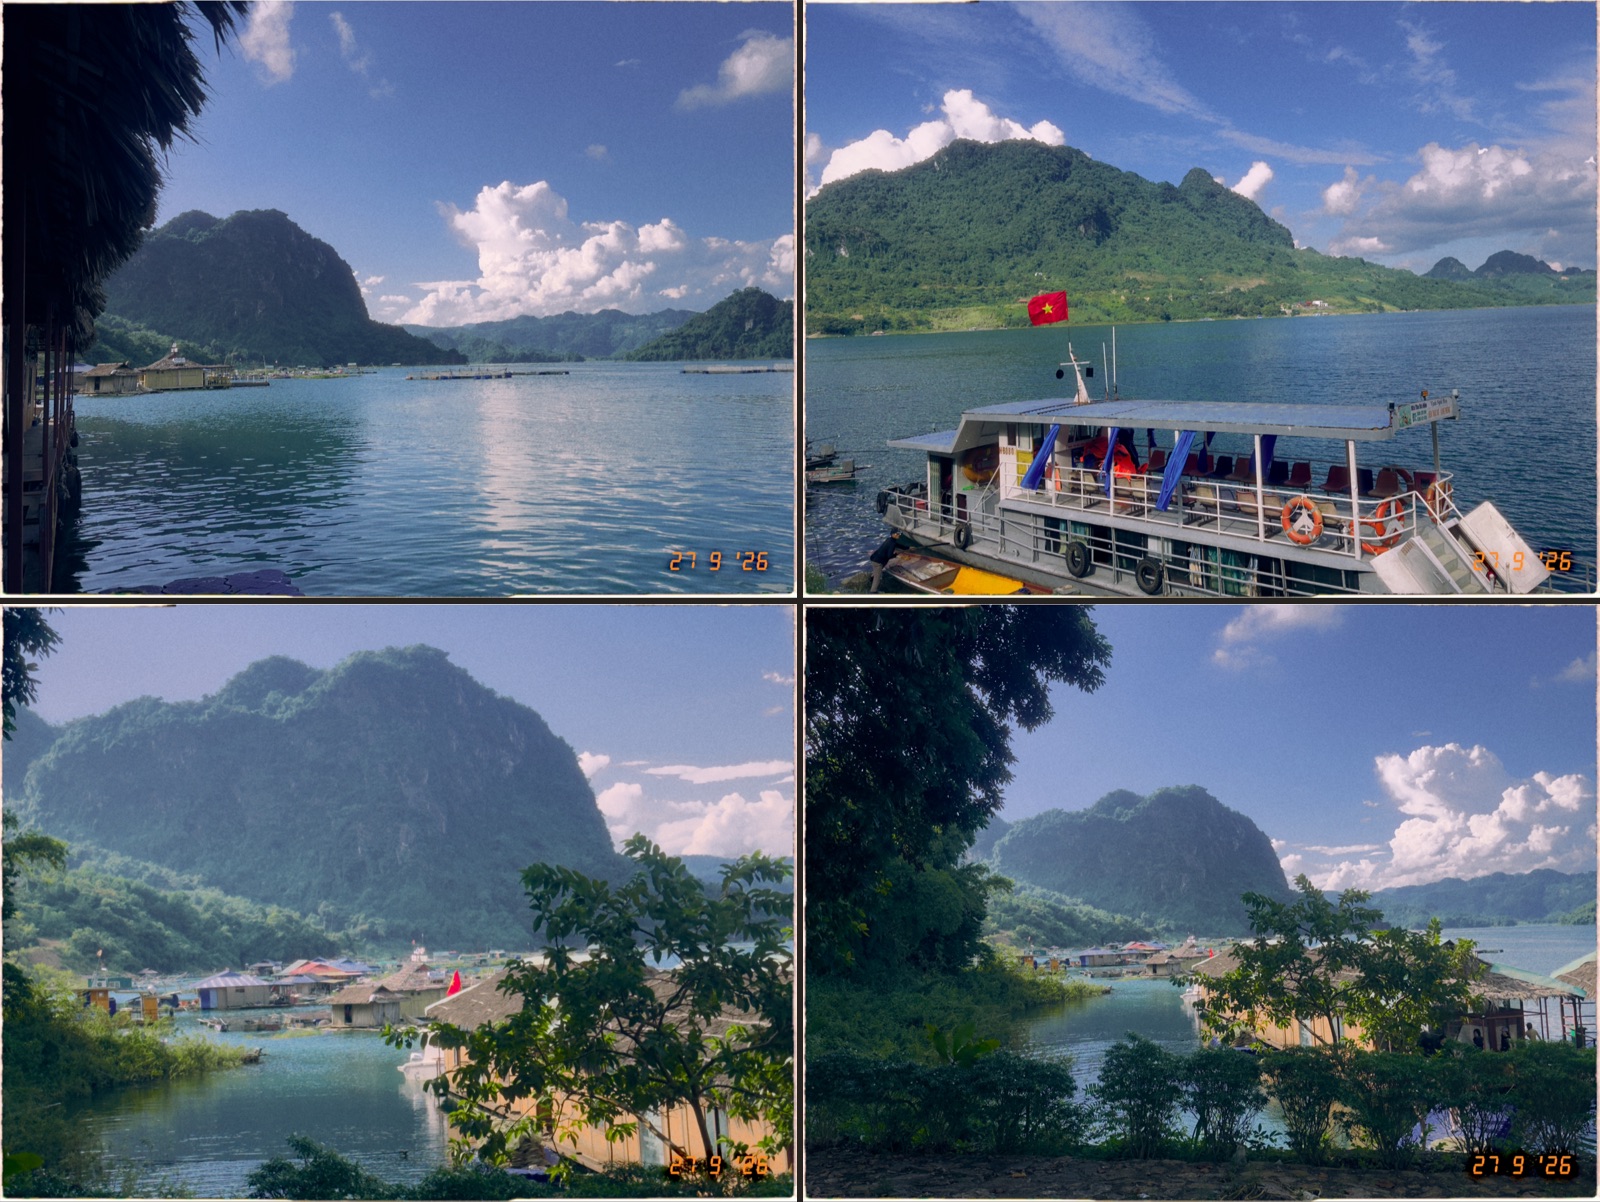
When the roll is finished, you develop it. You choose a border (none, weathered or scanned) and, if you like, a date stamp from each frame's capture time. The stamp is drawn as amber seven-segment digits with a soft glow, the way old compact cameras printed it, in four formats such as '26 9 27 or 27 9 '26 14:32.
Every roll develops under one lab recipe, the same for every film, tuned for what a good lab scan would give:
Colour +3 with weak colour chrome and weak colour chrome blue (none of the three on black-and-white film)
Highlight −1, Shadow +0.5
Dynamic Range Auto up to DR200, decided per frame
AWB with no shifts, Clarity −1, Sharpness −1
A light, fine grain (25 on colour, 30 on black and white), halation 10 and vignette 10
Roll photos live only in their roll: they stay out of the Photos grid and its counts, and a Card or Overlay share prints the film name and frame number instead of settings. The same release added multi-select in Photos, to save, share or delete several photos at once.
A real 12-exposure roll of Toffee Neg, shot on my phone at a lake and developed with the weathered border and the date stamp.Four frames from a roll of Dusk, developed with the weathered border and the 27 9 '26 stamp.
In the last three frames of a roll (10–12, 22–24 or 34–36) the counter beside the shutter turns amber and pulses after each shot. There's a light click on entering the last three frames and a firmer one on the last. On the last frame the line under the number reads LAST FRAME, and the film advance runs slower, as if the film were getting tight. Nothing blocks shooting.
When the last frame is taken, the strip winds back into the film's own canister, the canister turns and settles, and Roll complete fades in with the Develop button. It plays once per roll, and a tap skips it.
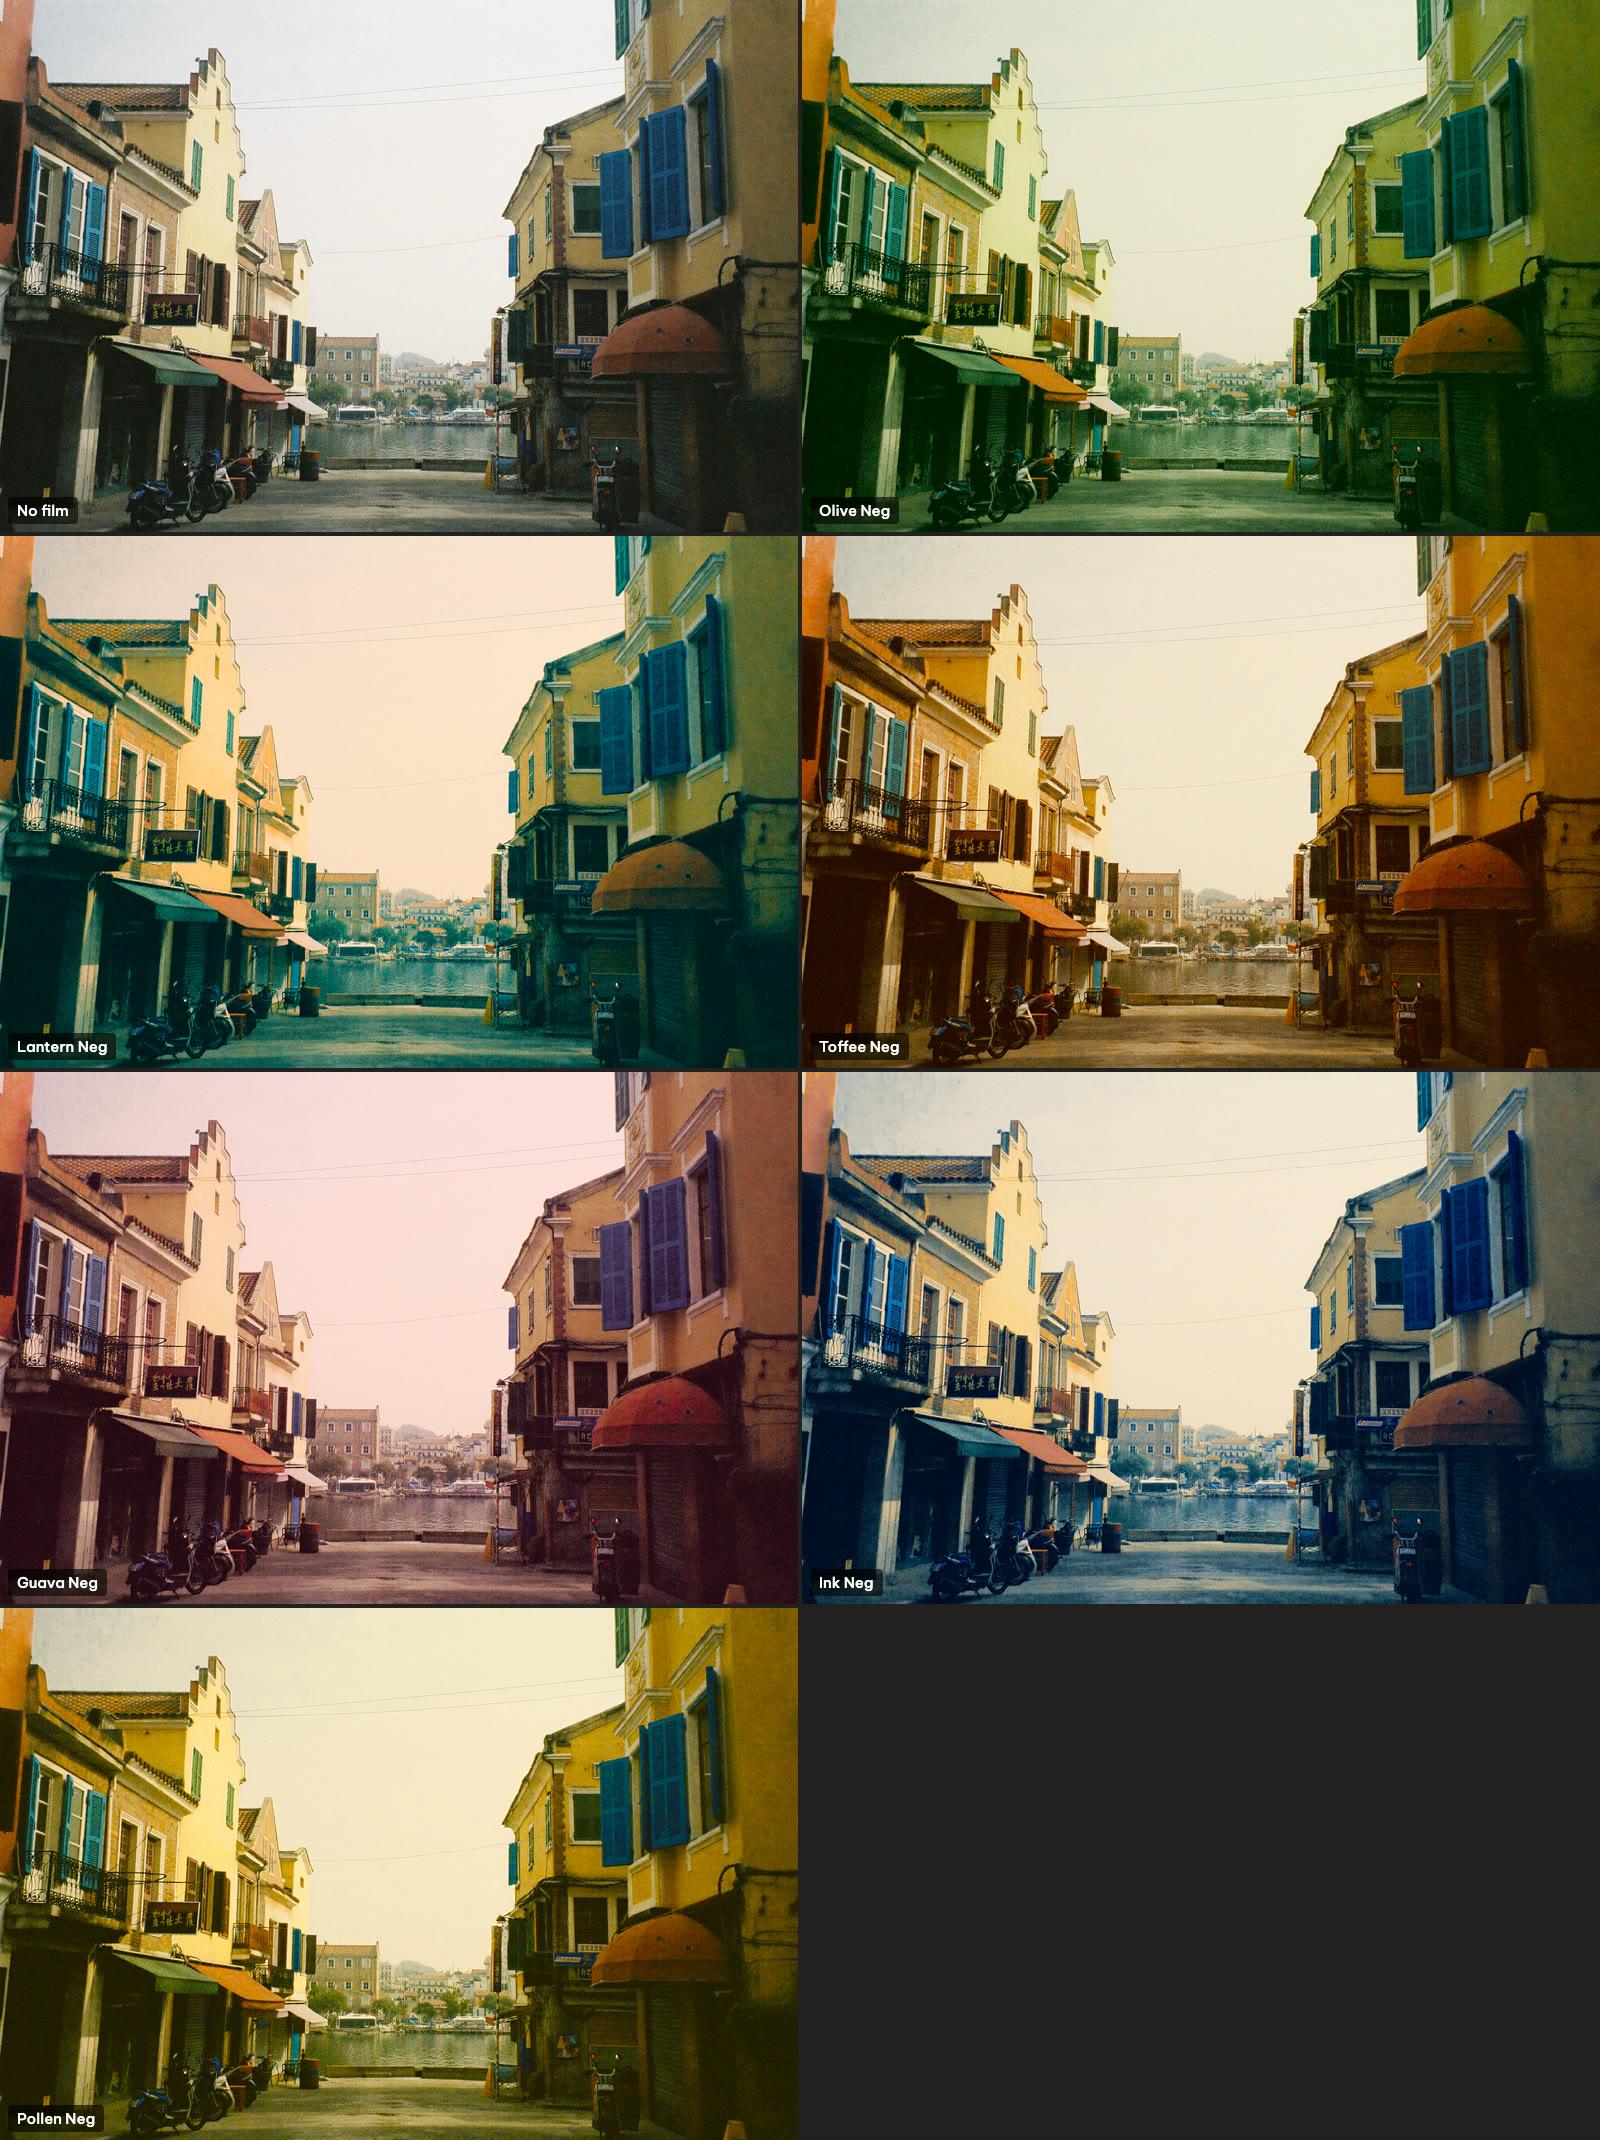
Five new colour negatives arrived with Roll mode. Like Olive Neg, each one tints the shadows, the midtones and the highlights at full strength, where most films only tint the ends.
Film
ISO
Look
Lantern Neg
800
Teal-cyan shadows and midtones, amber lamps and highlights, gold skin
Pink-rose through every tone, khaki greens, a lavender sky, crimson reds
Ink Neg
400
Navy shadows and midtones, cream highlights, warm reds against the blue
Pollen Neg
200
Sunny yellow over every tone, lime foliage, a deep blue sky, open shadows
They have no recipes yet, so the Films list now shows every film, not only those with a recipe. Each can still be shot on its own, loaded into a roll, or used to make a recipe.
A generated harbour street, not a photograph, with no film, Olive Neg for reference, and the five new films at full strength.
The rewind now follows the length of the roll: 1.8 s for 12 exposures, 2.8 s for 24 and 3.6 s for 36, easing slow–fast–slow. Each frame wound back gives one light crank tick, with a small knock on the canister. The canister is bigger now and sits on a soft panel with a faint amber glow.
The more important fix was underneath. Developing a 24 or 36-exposure roll crashed the app after about 15 frames. Each frame renders twice (a preview, then full resolution) on serial queues that only freed their temporary buffers when they went idle, and during a roll they never do. About 150 MB per ProRAW frame piled up until iOS killed the app. Now both queues release memory after every frame.
Frames developed
0
6
12
15
36
Before
554 MB
1.5 GB
2.1 GB
2.3 GB, climbing
35 of 36 developed
After
552 MB
333 MB
208 MB
247 MB
flat ~210–260 MB, 36 of 36
Memory footprint as each frame lands, from a test that develops 36 frames. Real 24 and 36-exposure rolls now develop on an iPhone 16 Pro.
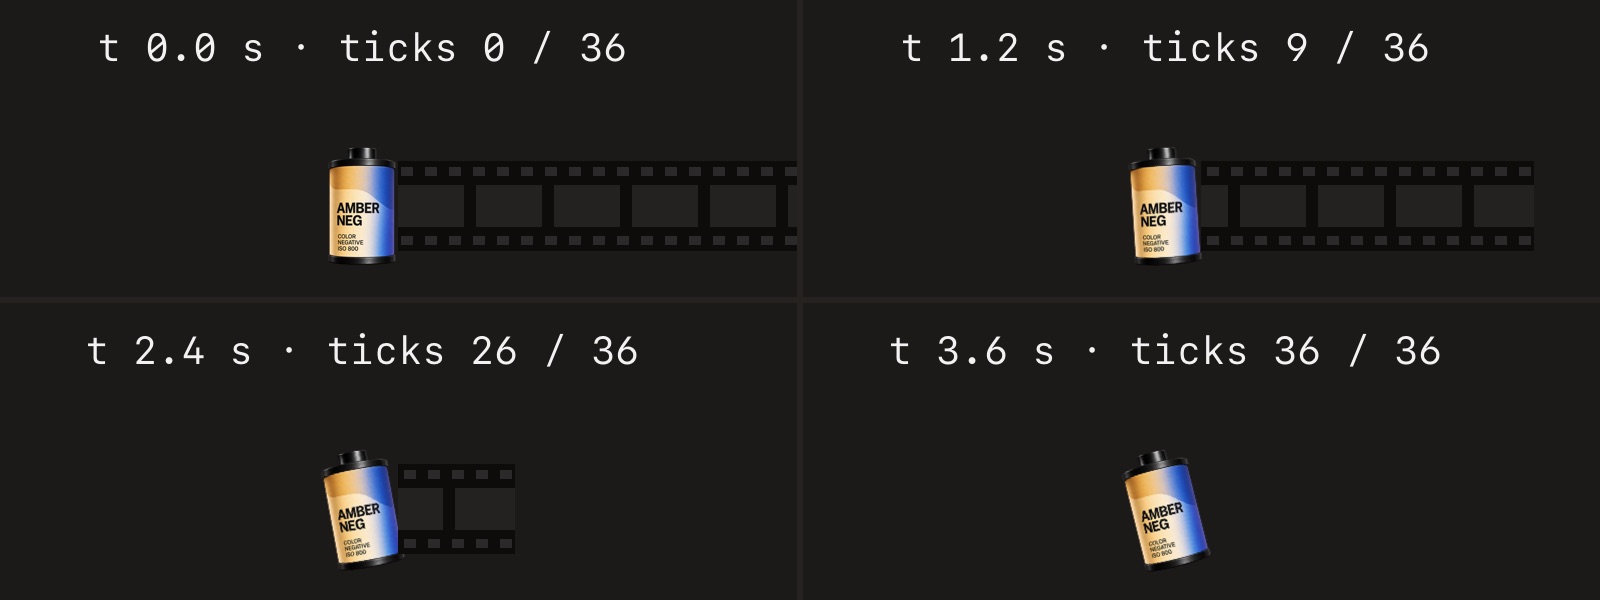
The timing of a 36-exposure rewind, from a test render made before the canister grew: 9 of 36 ticks at 1.2 s, 26 at 2.4 s, all 36 at 3.6 s.
fondercam.online has a new homepage, in English and Vietnamese. It tells the app as one roll of film: shoot, develop, print. The pictures are from my own Film Roll shoot, with their borders and date stamps. The fonts are served from the site itself, and this diary now shares its header and footer.
The first homepage mostly explained what Fonder could do: films, recipes, developing, controls. All true, and all beside the point.
I'm not building Fonder because iPhones need more filters. I'm building it because phone cameras became incredibly good while taking photos somehow became less fun. Somewhere in writing marketing notes this week, that stopped being a feeling and became the actual brief: the feeling of film, not just the look.
So the site changed too. The homepage now starts with what Fonder tries to bring back — limitation, anticipation, imperfection, and seeing a whole roll at once — and the features moved down a level, where they belong: as proof, not as the pitch. The recipes page learned to talk about moments before colour science, every film got a line about when you'd load it, and the whole site now reads in Vietnamese as well, my own translation.
Same product. Better order.
This site uses Google Analytics to count visits. OK?
 Fonder